Adding Libraries
As mentioned earlier, Poser creates Runtime and Download libraries during installation, dependent upon which content you elect to install during installation. There is also a great deal of third-party content available for Poser, and if you have acquired a large collection you may find it necessary to arrange your content into multiple library folders. Then you can use the following process to make your additional folders appear in the Library palette.
Generation of thumbnails will be affected by the number of runtimes you add as external runtimes. This issue is more noticeable on Mac computers, where the number of external runtimes is limited to no more than 996.
Poser will perform top-level indexing when new Runtime libraries are added. A yellow circle appears underneath the Search icon when the library is being indexed. Searches performed during indexing may not include all results until after indexing is complete.
By default, Poser triggers indexing upon first launch. You can optionally configure Poser to refresh indexing any time you launch the library. You’ll find this setting in the Library tab of the General Preferences dialog, as described in Library Preferences.
Library indexing will also be initiated when you refresh library folders. Adding an item to the Library will also initiate indexing in the directory to which the item was added.
Runtime folders have a structure similar to the following:
- Runtime
- Geometries
- (vendor or product folder)
- OBJ files for product
- (vendor or product folder)
- Libraries
- Camera
- (vendor or product folder)
- CM2/CMZ and PNG thumbnails for cameras
- (vendor or product folder)
- Character
- (vendor or product folder)
- CR2/CRZ and PNG thumbnails for characters
- (vendor or product folder)
- Face
- (vendor or product folder)
- FC2/FCZ and PNG thumbnails for faces/expressions
- (vendor or product folder)
- Hair
- (vendor or product folder)
- HR2/HRZ and PNG thumbnails for hair
- (vendor or product folder)
- Hand
- (vendor or product folder)
- HD2/HDZ and PNG thumbnails for hands
- (vendor or product folder)
- Light
- (vendor or product folder)
- LT2/LTZ and PNG thumbnails for lights
- (vendor or product folder)
- Materials
- (vendor or product folder)
- MT5/MZ5 or MC6/MCZ and PNG thumbnails for materials
- (vendor or product folder)
- Pose
- (vendor or product folder)
- PZ2/P2Z and PNG thumbnails for poses
- (vendor or product folder)
- Props
- (vendor or product folder)
- PP2/PPZ and PNG thumbnails for props
- (vendor or product folder)
- Scene
- (vendor or product folder)
- PZ3/PZZ and PNG thumbnails for scenes
- (vendor or product folder)
- Camera
- Textures
- (vendor or product folder)
- Texture image files for product
- Texture image files for product
- (vendor or product folder)
- Geometries
Poser products do not always contain all of the above-mentioned folders beneath the Runtime folder. For example, if you are installing a piece of clothing, it might add files in the Geometries, Props, and Textures folders but not in the others.
As an example of creating a new Library on your hard drive, assume the following:
- You have collected dozens or hundreds of items that relate to several different figures. You want to arrange them into different libraries that make the content easier to find.
- You have an external hard drive D: that has lots of room to store content. You decide you want to install all of your content there.
- You create a Content folder to store all this content. Beneath that Content folder, you create other subfolders to store each of the content types you want to organize. The folders can be named for a specific figure (Miki 3, Terai Yuki, etc) or type of character (Monsters, Animals, etc), or even a theme (Anime, Horror, Sci Fi, etc). Arrange them in any way you like. The following example demonstrates this:
Your external runtime structure might look as follows:
- D:
- Content
- Aiko
- Animals
- Anime
- La Femme
- L'Homme
- Miki
- Monsters
- Victoria
- Michael
- Content
Now you want to install all of the content that relates to one figure (such as the Miki 4 figure). You extract/install all of your Miki 4 clothing, hair, and other related content into the D:\Content\Miki folder. The ZIP file usually includes the Runtime folder and all of the associated geometry, library, and texture files. The final path to the runtime folder is D:\Content\Miki\Runtime as shown below.
Adding a Library folder.
To add this example Miki Library to Poser, you would proceed as follows:
- Open the Library palette if it is not open.
- Click the Add Library button (+) to open a standard Browse for Folder dialog box.
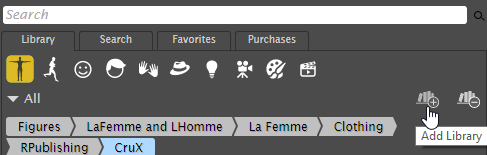
The Add Library icon.
- Select the hard drive that stores the Library files you want to add (for our example, you would choose D:)
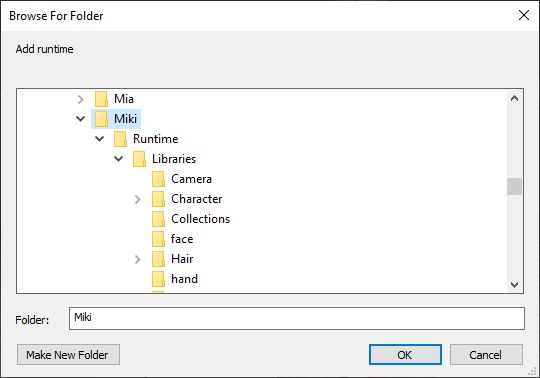
- Navigate to the folder that stores the Runtime folder and its subfolders. Do not select the Runtime subfolder, select its parent folder. For our example, you would expand the Content folder, then choose Miki).
- Click OK to add the new Library.
When adding existing Poser libraries to your Poser Library palette, you must preserve your Runtime folder name and structure (<drive > :\<folder > \<subfolder > \Runtime\<folders >. Navigate the Browse dialog to your desired Runtime folder. The added Library will appear using the name of the folder containing the Runtime folder.
Poser allows you to create your own folders to store your own poses, material settings and other creations, or so that you can organize library items to your liking. See Creating Subfolders .