FBX Export Settings and Steps
The File > Export > FBX command allows you to export FBX files to third party applications that support this format. Various options allow you include rigging, morphs, animation, and textures.
To export an FBX file, follow these steps:
- Choose File > Export > FBX. The Export Range dialog appears.
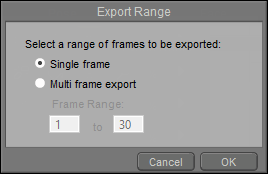
Export Range dialog.
- Do one of the following:
- To export only the current frame, choose Single Frame.
- To export more than one frame, choose Multi Frame Export, and then enter the desired frame range in the number fields.
- Click OK to continue. The Select Objects dialog prompts you to select the items that you want to export. By default, the main camera and all scene objects are selected. To choose specific items, uncheck the Universe item at the top of the list, or click the Select None button. This will deselect all objects. Then check each individual item that you want to include.
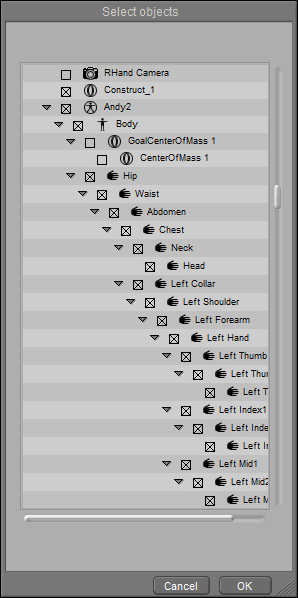
Select Objects dialog.
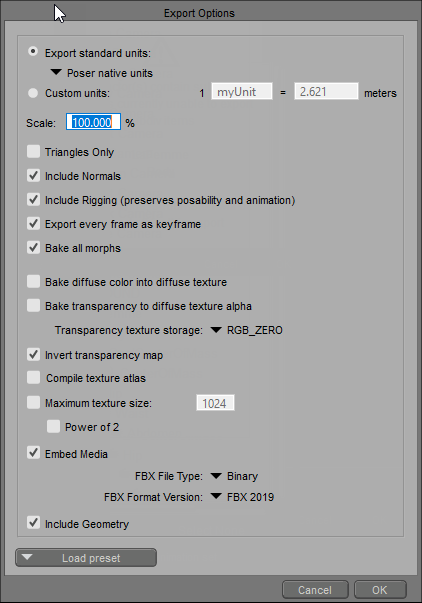
- Click OK to continue. The FBX Export Options dialog appears with the following options:
If subdivision is set on any of the objects in your scene, Poser will warn you that subdivision will be turned off for the FBX export. Click Cancel to return to Poser, or OK to continue.
Export Options dialog.
- Load Preset: The Load Preset button, located at the bottom of the FBX Export Options dialog, provides a Default preset, as well as preset configurations for export to other popular applications. If you are exporting to one of these specific applications, we recommend that you select the applicable preset first, and then use additional settings as described below.
- Export standard units: Use the drop down list to choose the standard unit measurement that you want to use when you export the FBX file. Choices are Poser native units, Inches, Feet, Millimeters, Centimeters, or Meters.
- Custom units: Use this section to set up a custom unit for your FBX export. Assign a name for the unit of measurement in the Name field, and then enter the equivalent number of meters in the Meters field.
- Scale: By default, Poser exports the FBX file at 100% scale (based on whatever unit of measurement you select). You can use the Scale field to export the FBX file based on a different percentage value.
- Triangles Only: Check this option to export an FBX file that consists of triangles. Any polygons have more than three sides will be converted to two or more triangles. Leave the option unchecked to export the geometry in its default state.
- Include Normals: Check this option to export normal information in the FBX file.
- Include Rigging (preserves posability and animation): When this option is checked, Poser will export rigging (such as bones and groups) so that the character can be animated in the target application. Uncheck this option if you do not want to include the skeleton and other rigging information.
- Export every frame as keyframe: If you are exporting an animated FBX file, check this option to create a keyframe for each frame in your animation.
- Bake all morphs: Leave this option checked to export a character based on all morphs that are currently set to a value other than zero. Uncheck this option if you want to export morphs that can be animated in your third-party software.
- Bake diffuse color into diffuse texture: When checked, Poser will tint the exported diffuse texture map based on base diffuse color settings in the Material room. The exported geometry will be set so that all base diffuse colors are white. When this option is unchecked, the diffuse texture will be exported in its original colors, and the materials in the geometry will use the base diffuse colors as set in Poser’s Material room.
- Bake transparency to diffuse texture alpha: When checked, Poser will not generate a transparency map. Instead, transparencies will be applied in the alpha channel of the diffuse texture. When unchecked, Poser will include a transparency map with the exported FBX file.
- Transparency texture storage: Check this option to bake transparency maps to a channel. By default, transparencies are baked to the RGB_ZERO channel. You can alternatively bake to the A_ONE channel by selecting that option from the channel selection menu.
- Invert transparency map: Transparency maps in Poser use black areas as fully transparent, and white areas as fully opaque. Check this option if your external application uses the reverse (white areas as transparent and black areas as opaque).
- Compile texture atlas: When checked, the Texture Atlas Options dialog (described in Texture Atlas Options) will appear so that you can choose which texture maps are combined and saved with your FBX file. When unchecked, Poser will export all texture maps that are included in the object(s) you are exporting in their original size.
- Maximum texture size: Enter a value for the maximum height or width for the texture(s) that are generated for the FBX file. To restrict the texture to a power of 2 (such as 1024, 2048, or 4096 pixels), check the Power of 2 option.
- Embed Media: When checked, Poser will embed texture information into the FBX file so that external textures are not necessary. This option is recommended if files will be distributed to others. When unchecked, textures will be exported.
- Include Geometry: Check this option to include geometry with your exported FBX file. Uncheck the option to create an animation-only FBX file.
- FBX File Type: By default, the FBX export will be written in Binary format. ASCII format is available as an option.
- FBX Format Version: FBX 2019 is selected by default. Other options include FBX 2018, FBX 2016, FBX 2014, FBX 2012, FBX 2011, FBX 2010, FBX 2009, and FBX 2006. Check the documentation for your target application to determine which format it expects.
- After selecting all of your export options, choose OK. The Export as FBX window prompts you to choose a folder and assign a filename.
- Click Save to save the FBX file.