Material Room
Poser’s Material room is a very powerful tool for creating and editing procedural shaders for the content in your scene. The Material room is designed from the ground up to provide the ultimate in power, flexibility, and ease of use by artists and animators. You don’t need to be a programmer! The Material room gives you ultimate control over the appearance of your Poser scenes.
The Material room allows you to describe the material properties of your objects’ surfaces by giving you full control over every aspect of shading a surface, from the surface color to complex lighting interactions.
In this chapter we will explore the Material room’s basic building blocks. For a more detailed look at working with shaders and nodes in the Material room, please refer to Working with Nodes and Root Nodes.
Access the Material room by clicking the Material room tab at the top of the Poser workspace.
The Material room appears as follows.
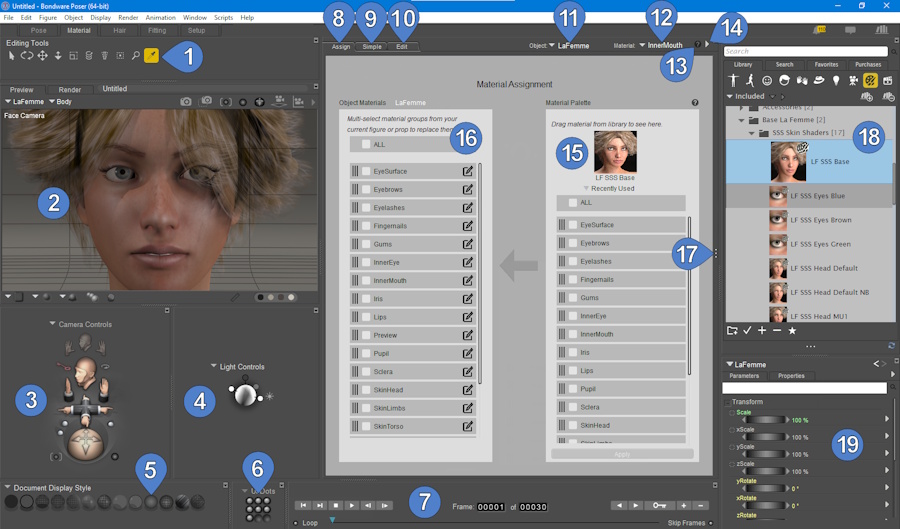
The Material room.
The number of palettes and options that you see in each room depends upon your screen resolution. At higher resolutions, the default workspaces display more palettes, while at lower resolutions you see fewer palettes:
The Material room offers two options for working with surface materials: the Assign view and the Edit view tabs. By default, the Assign view of the Material room is displayed when you first start up Poser. This allows new users to get familiar with assigning Materials before diving into the Advanced settings of the Material room.
Poser’s Material room contains the following items at 1280 x 960 resolution. Less items will appear at lower resolutions, and more options will appear at higher resolutions.
1.Eyedropper Tool: The Eyedropper tool appears with the Editing tools. Enabling it and clicking an object in your scene opens that object’s shader tree for editing in the Shader window.
2.Document Window: Please refer to The Document Window for information about the Document.
3.Camera Controls: Please refer to Camera Controls.
4.Light Controls: Please refer to Lighting for information about the Light controls.
5.Document Display Styles: Allows you to select one of several different display styles for the elements in your scene. See The Display Controls and Menu for more information about the various display styles.
6.Pose, UI and Camera Dots: Allows you to store figure poses, user interface settings, and camera settings for retrieval at any time until you close your Poser document. See Memory Dots.
7.Animation Controls: Please refer to Using the Animation Controls for information about the Animation controls.
8.Assign Tab: Click this tab to use the Assign view to copy properties from a library material or material collection to the currently selected object. For more information, see Assign View.
9.Simple Tab: Simple material creation with basic settings.
10.Edit Tab: Click this tab to edit or create advanced shaders that you can apply to your objects or save to the library. Shaders consist of a root node and as many connected nodes as you need to create a specific type of material. Please refer to Working with Nodes and Root Nodes for more information about working with shaders and nodes.
11.Object selection: Click the down arrow to select one of the objects in your scene.
12.Current Material List: The Current Materials list displays all of the material groups in the currently selected object. Poser organizes materials by figure/prop, thereby avoiding confusion when assigning materials and allowing you to, for example, assign different eye or skin colors to each figure.
13.Material Room Help: The (?) icon at the top right of the Shader window opens the Material room Help document. This HTML document contains information about using nodes and shaders to define surface material attributes.
14.Options pop-up menu: Click the white right-arrow to display the Options pop-up menu in the Advanced tab of the Shader window This allows you to add, cut, copy, paste, select, and deselect nodes. For convenience, this can be also accessed by right-clicking within the Advanced tab. The Drag-Dock enable button, just to the right of the Options button, allows you to set the Material window to a dockable or undockable state. Undocking, for example, would allow you to move the Material window to a second monitor.
15.Material Palette: Drag a material or material collection from the library and drop it into the preview thumbnail area. A list of the materials will appear and you can select all or some of the different material zones to transfer to your selected object.
16.Object Materials: Displays a list of materials in your currently selected object.
17.Wacro Drawer Widget: The Wacro Drawer is typically hidden. Click the Wacro Drawer widget to expand the drawer. The Wacros allow you to select from many predefined shortcuts that cover various material setup tasks. For more information about the Wacro Drawer, please refer to Wacros.
18.Library: The Library window appears in the far left section of the Material room if space permits. See The Poser Library.
19.Parameters/Properties palette: Please refer to The Parameters/Properties Palette for information about the Parameters/Properties palette.
Using Objects with Multiple Materials
Each figure/prop has its own unique material list containing individual materials within that list. You can see this for yourself by creating a Poser scene with two or more figures/props and opening the Material room.
.jpg)
Two figures in a scene.
This sample scene has two figures. The Material room therefore displays the following selections:
.png)
Materials found in L’Homme and La Femme.
As you can see, the two figures in this image each have different materials lists. Each object in a Poser scene has its own list of materials, which is different for each object.
Assign View
.jpg)
Material Room: Assign view
Sections in the Assign View
The Material Assignment window contains the following key areas:
1.Assign Tab: Click this tab to view the Assign tab in the Material Room (as discussed in this topic)
2.Edit Tab: Click this tab to display the Edit tab, where you can create advanced shaders and materials. The Edit View topic gives a brief overview of this tab and provides links to more advanced topics.
3.Object Selector: Allows you to select any character or prop or other items in your scene. The materials included in the selected object will appear in the Object Materials tab (7). You can also select an object by clicking it with the Eyedropper editing tool.
4.Material Selector: Allows you to choose a single material in the selected object. The materials included in the selected object will appear in the Object Materials tab (7). You can also select a material by clicking it with the Eyedropper editing tool.
5.Help icon: Click the Question Mark icon to display room help for the Assign tab.
6.Object Materials section: See Object Materials, below.
7.Material Palette section: See Material Palette section, below.
8.Apply Material button: Select at least one material from the Material Palette column, and one material zone from the Object Material column to assign materials to the scene.
Object Materials
The Object Materials section (#6 above) lists the material zones that exist in the currently selected object in your scene. The changes will be applied to any or all of the materials in the list.
•To change all of the materials in your selected object, choose ALL.
•To change some of the materials in your selected object, check the box beside the materials you want to change.
•You can also drag and drop materials from this list onto another object in the Scene window.
Material Palette
The Material Palette section (#7 above) allows you to preview a material before you apply it to an object in your scene. You can also drag and drop from this column to the Object Materials, or directly to any object in the scene.
1.Use the Object Selector (#3 above) to choose the object that you want to assign materials to. The materials in the object display in the Object Materials section.
2.Drag a material from the library and drop it onto the material preview chip at the top of the Material Palette.
3.Check the material(s) in the Material Palette that you want to apply to the selected object.
4.Select the material zone(s) in the Object Materials section that will receive the materials you selected in Step 2.
5.Click the Apply button.
Several use case examples are shown below.
Assigning Materials Assigning a Single Material (MT5)
MT5 materials are used to apply a single material to any material zone in a figure or objects. MT5 materials are often tileable, so that they can be applied to any object. This shows how to assign a single material to one material in an object.
1.Use the Object Selector (#3 above) to choose the object that you want to assign materials to. The materials in the object display in the Object Materials section.
2.Drag the new material you want to use from the library to the top of the Material Palette column.
3.Check one material zone in the Material Palette column.
4.Check one material zone in the Object Materials column.
5.Then click Apply.
.jpg)
Assigning a Single Material.
Copying a MT5 Material to Multiple Zones
You can also apply MT5 materials to multiple material zones in a figure or object. This shows how to assign a single material to one material in an object. The steps are similar to the above, except that you select two or more materials to apply to in the Object Materials panel.
1.Use the Object Selector (#3 above) to choose the object that you want to assign materials to. The materials in the object display in the Object Materials section.
2.Drag the new material you want to use from the library to the top of the Material Palette column.
3.Check one material zone in the Material Palette column.
4.Check two or more material zones in the Object Materials column.
5.Then click Apply.
.jpg)
Assigning a Material to Multiple Zones.
Assigning a MC6 Material Collection
Material Collections (MC6) are used to combine several material zones found in a content item into one single material file. For example, a material collection can contain all of the different materials in a human character (head, torso, limbs, eyes, lashes, nails, and so on), or all material zones in a piece of clothing (blouse, sleeves, pockets, buttons, and so on). When assigning MC6 materials, you will need to use material collections that are made for that specific character (La Femme, Victoria 4), or that specific clothing or prop item).
To completely replace the material collection in the selected object:
1.Use the Object Selector (#3 above) to choose the object that you want to assign materials to. The materials in the object display in the Object Materials section.
2.Drag the material collection from the library to the top of the Material Palette column.
3.In the Material Palette column check ALL.
4.In the Object Materials column check ALL.
5.Then click Apply.
.jpg)
Assigning a Material Collection.
Applying Part of a MC6 Material Collection
Sometimes you want to keep some materials in your object, but replace others, This is easy enough to do in the Assign tab. For example, if you only want to change the skin and lips on a figure, but keep the eyes, inner mouth, and nails as they are, you would proceed as follows:
1.Use the Object Selector (#3 above) to choose the object that you want to assign materials to. The materials in the object display in the Object Materials section.
2.Drag the material collection from the library to the top of the Material Palette column.
3.In the Material Palette column check only the materials you wish to apply (the skin materials and the lips).
4.In the Object Material column check the material zones you wish to apply the material to (the skin materials and the lips).
5.Click the Apply button. The materials will be applied only to zones with matching names.
.jpg)
Assigning Part of a Material Collection.
Edit View
The Edit view of the Material room is where you build shaders by working with nodes. Please refer to Working with Nodes and Root Nodes for more information about shader nodes and how they function within Poser.
.jpg)
The Advanced shader view.
The Edit view contains the following elements:
1.Object menu: The Object menu functions similarly to the Current Actor menu and has the following options: Props (includes strand-based hair and dynamic cloth), Lights, Figures, and Background.
2.Material menu: The Material pull-down menu lists all of the materials available for the currently selected actor. Poser uses Multi/Sub-object materials, which means you will only see the materials assigned to the currently selected figure/prop in this menu.
3.Options Menu: Clicking the arrow on the right side of the Shader menu opens the Options menu for the Material room. You can also open this menu by right-clicking in any blank area within the Shader window or by clicking any node input (see Working with Nodes).
4.Title Bar: You can reposition the Shader window using its title bar.
5.Wacro Drawer: The Wacro Drawer allows you to select from ten predefined shortcuts that cover various material setup tasks. See Wacros for specific information on these shortcuts.
6.Root Node: The root node for the currently selected object or material group appears on the left side of the Shader window.
7.Nodes: Additional nodes also appear in the Shader window.
8.Layers: Click to select another layer in a multiple-layered material.
9.Add/Remove Layer: Click to create a new layer, or to delete the currently selected layer, refer to Creating Layered Materials
Creating Layered Materials
Layered materials allow you to create advanced material shaders for SuperFly.
![]()
To create a layered material,
Create or select the material to which you want to add a layer.
1.Switch to the Edit material view.
2.The material layers list appears in the upper left corner of the material window. You can use this list to choose between the base layer and any additional layers that have already been created.
3.To add a layer, click the Add Layer button (+ sign) that appears to the right of the material layer list.
.jpg)
The Add Layer button.
4.The material view will immediately switch to the new layer, which contains a PoserSurface node with no connections. You connect material nodes to this PoserSurface node in the same way you connect nodes in the base layer.
5.Verify that the SuperFly Root checkbox is checked in the top section of the Poser Surface node. Even though the FireFly Root is checked, layered materials do not render in FireFly. Using Layer-Only Materials
Layer materials are a special type of material that adds a layer to an existing base material. Essentially, a layer-only material is a partial material file that does not have a base layer. Unlike a conventional material they never replace the material that's already loaded. A Layer material always adds another layer. This makes this type of material ideal for use as a add-on to other materials. They can be used to add makeup, dirt, scars, tattoos and other details to an existing material.
Layer materials can contain multiple materials in a single file the same way a Material Collection contains multiple materials. The material layer is meant to be used in conjunction with a base material but the base material is saved as a Material Collection (MC6 extension for uncompressed, and MCZ extension for compressed).
Layer-only materials will be saved to the library with a new file extension and file type icon to differentiate from a regular material collection. The MLC extension will be used for uncompressed Layer-Only materials, and the MLZ extension will be used for compressed Layer- Only materials.
Material layers only work with the SuperFly render engine. When rendered using FireFly they simply won't render.
•Applying the first layer-only material to a base layer will add a layer above the base.
•Applying another layer-only material will not replace an existing one. A new layer-only material layer will be added to the existing layers.
![]()
Creating Layer-Only Materials
To create a Layer-Only material, follow these steps:
1.Open the Material Editor in Edit view and select the material to which you want to add a layer.
2.Click the Material Layers button at the top of the editor window. The Material Layers window opens. The Base layer, and any other existing material layers will be shown in the list.
.jpg)
Material Layers button.
.jpg)
Material Layers window.
3.Click the + (plus) button to add a new material layer. The layer will be placed above any existing base or material layers, similar to image layers in Photoshop. By default, the layer will be named Layer_x, with x being the next available layer number.
4.Click the Rename button to enter a more descriptive name for the material layer.
.jpg)
Renaming a material layer.
The Material Layer Editor allows you to manage layers in a material. The [+} and [-] buttons allow for adding and removing material layers. The Rename button brings up a dialog to enter a name for the selected layer. The up and down arrows move the selected layer up and down the layers.
Building the Layer-Only Layer
Use the Edit view in the Material window to build your material layer. Keep in mind that material layers work in SuperFly only, so you may prefer to use the Physical Surface root, or the Cycles Surface root with the Principled BSDF node.
In this simple example, the Physical Surface root is added for SuperFly materials.
•The Color channel is used to define the eye shadow color.
•A mask that designates the eye shadow area is attached to the Transparency input, which is set to 1.
•A Cycles > Color > Invert node is used to invert the eyeshadow mask for the Roughness input. The darker areas will appear more glossy, and the white areas will allow the roughness from the base area to remain unaffected. The Roughness is set to .5 in the Physical Surface node.
•A 3D Textures > Spots node is used to simulate metallic flakes. A Color Math node multiplies the spots with the eyeshadow mask to only apply the spots to the eyeshadow. Then it connects to the Metallic input of the Physical Surface node, with the value set to 1.
.jpg)
Building a material layer.
Managing Material Layers
The Material Layers window also allows you to manage material layers as follows:
•Use the - (minus) button to delete the selected material layer.
•Use the up arrow to move the selected layer toward the top of the layer stack.
•Use the down arrow to move the selected layer toward the bottom of the layer stack. Layers cannot be moved below the base layer.
Saving Layer-Only Materials
To save your material layer to the library, follow these steps:
1.Select the figure or object that contains the materials that have layers you intend to save to the library.
2.Select the Materials category from the Poser Library.
3.Create or navigate to the folder that you want to use for your materials and material layers.
4.At the bottom of the library click the (+) button to add a library item. The New Material Set window appears.
5.Name the material layer appropriately. In this case, the name is set to Eye Shadow Light Blue.
6.Select the Material Layers radio button at the bottom of the New Material Set dialog. This option will be grayed out if the selected object has no materials.
7.By default, all of the layers in all materials of the selected object will be saved. To choose specific materials or layers, click the Select Layers button. Then check the options you want to include, and uncheck the options you want to exclude. Click OK to confirm the layer selections.
8.When you return to the New Material Set window, click OK to save the material layer to the library.
.jpg)
Saving a material layer.
Wacros
Wacros are easy-to-use scripts designed to complete specific tasks within the Material room. The Wacro Drawer comes with ten predefined Wacros, each of which accomplishes a basic material setup task or process--often with the click of a single button. You can save time by using Wacros for some of the more common tasks you might wish to undertake in the Material room. Wacros all act upon the root node for the selected object or material. For more information on the various attributes on the root nodes, please see Root Nodes.
Poser also supports user defined Wacros, which you can write using Python scripting, and then place in the Runtime\Python\poserScripts\Wacros\UserDefined folder within your Poser installation folder. Your Wacros will then appear in the User Defined pop-up menu. Please see Using PoserPython for more information about writing Python scripts for Poser.
.jpg)
Material Wacros.
The following Wacros are included with your Poser installation:
•Add Reflection: Before clicking the Add Reflection Wacro button, make sure you have selected a material to which you want to add reflective attributes. When you click the Add Reflection button, Poser will attach the following nodes:
•A Reflect raytrace node will be attached to the input of the Reflection_Color attribute on the root Material node. The Reflect node specifies the reflection color when raytracing. See Reflect for more information on the Reflect node’s attributes.
•A BG Color node will be attached to the input of the Background attribute on the Reflect node.
•Add Refraction: Before clicking the Add Refraction Wacro button, select a material to which you want to add refraction. Refraction causes light to bend as it passes from one transparent medium (material) to another; the degree to which this occurs depends on the material’s refractive index. Note that refraction only affects transparent materials, so the material you select must be made transparent for refraction to be visible. Click the Add Refraction button. If you have selected a material that is opaque, a dialog will appear asking whether you wish to make the material transparent and add refraction. Click Yes on this dialog to proceed. Poser will then add the following nodes:
•A Refract raytrace node will be attached to the input of the Refraction_Color attribute on the root Material node. The Refract node specifies the refraction color when raytracing. See Refract for more information on the Refract node’s attributes.
•A BG Color node will be attached to the input of the Background attribute on the Refract node.
•Set the Refraction_Value attribute on the root Material node to between zero and one in order to see the refraction effect in your rendered image.
Refraction requires raytracing, so be sure to have raytracing selected when you render in order to see the refraction effect. We also recommend setting the number of raytrace bounces to at least two (or higher if you have reflective surfaces behind the transparent materials).
•Add Skin Subsurface Scattering: Clicking the Add Skin Subsurface Scattering Wacro button will apply a Subsurface Skin node to the selected material. The node will be attached to the Alternate Diffuse input of the PoserSurface node, and the Alternate Diffuse color will be set to white.
•Set Up Shadow Catcher: Clicking the Set Up Shadow Catcher button will enable the ShadowCatchOnly option on the Poser Surface node of the selected material. This Wacro will turn the selected material into a shadow catcher, which means that it will become transparent except for areas that are shaded by another object, which will show only the shadow. One example of how you might use this Wacro is if you created a scene showing a figure on the stairs prop, and you wanted to hide the stairs in order to composite the figure onto a photograph of actual stairs. For more information about the
ShadowCatchOnly attribute, and shadow catchers, see Root Material (PoserSurface) Node.
•Set Up Toon Render: The Set Up Toon Render Wacro will configure your material to appear cartoon-like when rendered. Clicking the button opens a dialog asking whether you want to have specular highlights on your toon surfaces. Click either No or Yes on this dialog to proceed. Poser will then attach the following nodes:
•A Toon diffuse node will be attached to the input on the Alternate_Diffuse attribute of the root Material node. See Toon for more information about the Toon node’s attributes.
•Two additional links will be created from the output on the material’s Image_Map node, to the inputs on the LightColor and DarkColor attributes on the Toon node.
•If you clicked Yes on the initial dialog, a Glossy specular node will be attached to the input on the Alternate_Specular attribute of the root Material node. See Glossy for more information on the Glossy node’s attributes.
•Create Atmosphere: In order to view the effects of the Create Atmosphere Wacro, you need to have something in the background of your scene, such as a background plane or additional figures or props. Then, select Atmosphere from the Object menu at the top of the Shader window. Clicking the Create Atmosphere button opens the Choose an Atmosphere dialog. Select the type of atmosphere you wish to create, from the following options: Fog, Smoke, SmokeyRoom, Depth_Cue. Then click OK. Poser will add the appropriate nodes to create the atmosphere you have selected. If you wish to know more about any of the specific nodes added, see Root Atmosphere Node. Render your scene to view the atmosphere effects.
•Set Up Light Style: The Set Up Light Style Wacro allows you to specify the style of light you wish to apply to a particular light. First, select the light you wish to configure from the
Object menu at the top of the Shader window. Then click the Set Up Light Style button.
The Select a light style dialog will appear, asking you to select a light style from the following options: diffuse only, specular only, white only. When you have made your selection, click OK. You will see a message confirming that the light(s) you had selected have been set to the light style you specified. Depending on the light style you selected, you will see the following effects:
•If you selected diffuse only, the Diffuse attribute on the root Light node will be set to white, and the Specular attribute will be set to black.
•If you selected specular only, the Specular attribute on the root Light node will be set to white, and the Diffuse attribute will be set to black.
•If you selected white only, the Color, Diffuse and Specular attributes on the root Light node will all be set to white.
•Set Up Ambient Occlusion: Clicking the Set Up Ambient Occlusion button will create an
Ambient_Occlusion raytrace node, the output of which is attached to the inputs of the
Diffuse_Value and Specular_Value attributes on the root Material node. See Ambient Occlusion (Ambient_Occlusion) for more information on the Ambient_Occlusion node’s attributes.
•IBL (Image Based Lighting): The IBL Wacro can only act upon lights, so make sure you have selected a light from the Object menu at the top of the Shader window, before using this Wacro. Clicking the IBL button will open the Texture Manager, which asks you to select a texture for the Image_Map node.
•Poser allows you to connect shader trees of any level of complexity to your Image Based Light; the IBL Wacro, however, is set up to use a single light probe image as an image map. Light probes are panoramic images that can record light levels from a 360 degree perspective, and are typically created by taking a high-dynamic range image of a mirrored sphere. Once you have selected your light probe image in the Texture Manager, click OK. Poser will attach an Image_Map node using your light probe to the input of the Color attribute on the root Light node. For more information on the Image_Map node’s attributes, see 2D Texture Nodes. For information about Image Based Lighting and light probes, see Diffuse Image-Based Lights (IBL).
To maximize your Image Based Lighting effects, we recommend using
Ambient Occlusion. See Light Properties for information on activating Ambient Occlusion for the selected light.
•Remove Detached Nodes: Clicking the Remove Detached Nodes button will clear away any nodes on the currently selected material group whose outputs are not attached to at least one other node. This Wacro is particularly useful for cleaning up complex shader trees, where the sheer number of nodes may make it difficult to see whether there are any detached nodes present in the Shader window.
If you press the Shift key while choosing Remove Detached Nodes, detached nodes will be removed from all sub-materials in the figure with a single click.
Even if one or more nodes are attached to inputs on a given node, if that node’s output is not attached to another node, it will be removed by the Remove Detached Nodes Wacro.
Shaders
A shader is a combination of nodes working together to create the final desired color, pattern, and texture -- in short, the look for your 3D objects. Every shader consists of a root node with a different number of attributes depending on the type of root node (Background, Material/Hair, Light or Atmosphere) being used. Each of these attributes can have one or more linked nodes that dynamically controls that attribute’s value or color. You can either create materials from scratch or load a pre-made material. Saving a material saves that materials’ shader tree, and loading a material also loads its shader tree. Also, if you load a pre-made material, you can modify it at will to create a whole new look. Please refer to Root Nodes for a detailed description of the root nodes.
.jpg)
Using nodes to build a shader.