.png)

Many products and assets for Poser are created with the lowest poly count possible. This allows for small file sizes and eases use on less powerful computers.
But what do you do with a model when you want more detail?
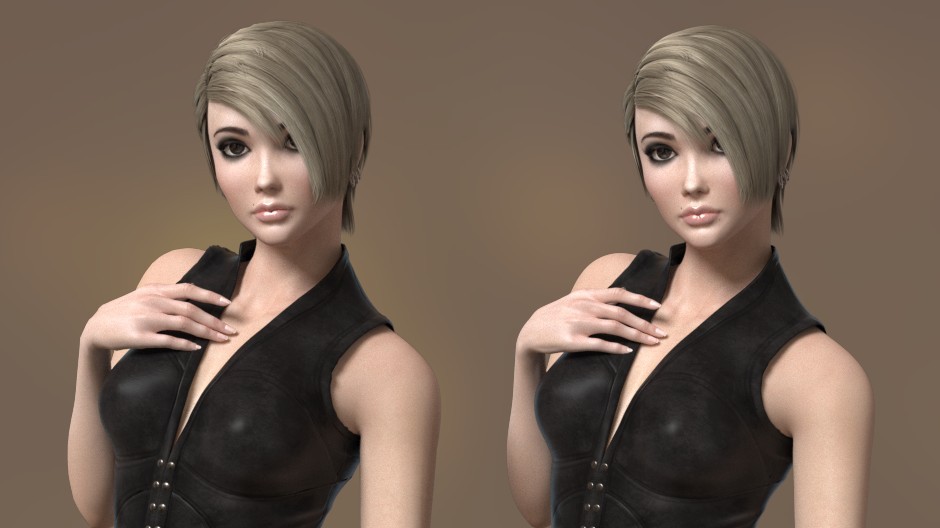
In Poser Pro 11, you can Subdivide Surfaces. This great feature lets users increase the number of polygons, which increases detail and smooths model surfaces. Poser creators and end-users can adjust sub-division levels depending on what level of detail they want and what their machines can render. By raising the Subdivision, creators can drastically improve the results of their renders.
How Polygons Work
In computer graphics, 3D models are made up of meshes, which are made of polygons. The central point of each polygon is called a vertex, which represents a point in three-dimensional space. When two vertices are connected by a straight line, it becomes an edge. When three vertices are connected to each other by three edges, it becomes a triangle. Four vertices become a quad, etc.
Low-poly models have fewer polygons and, therefore fewer vertices and less detail. High-poly models have more polygons, more vertices and more detail.
Subdividing the polygons split faces and edges into smaller pieces by adding new vertices. For example, a square can be subdivided by adding one vertex in the center and one on each edge, creating four smaller squares.

How Subdivision Works
In Poser, Subdivision can be applied to polygons that are made of three or more sides. What basically happens is that a vertex is placed in the center of each polygon, and then that vertex connects at the center of each of the edges in the original polygon. By increasing the Subdivision Level, you create more vertices and smooth the appearance of the model.
Pro Tip: Keeping all or most of the polygons in the model to four-sided polygons gives the best results in subdivision.
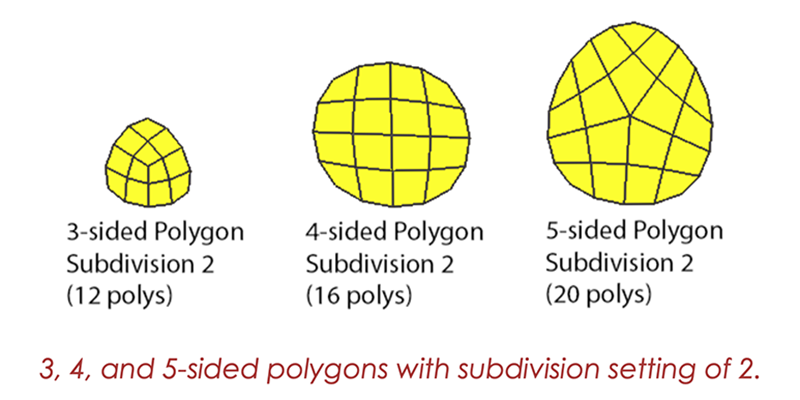
To explain how subdivision works, let’s start with a picture of three polygons: one with three sides, one with four sides, and one with five sides. With no subdivision, you see the polygons exactly how they have been created.


If you increase the level of subdivision one more time to a setting of 2, another vertex is placed in the center of each polygon that was created at level 1. Because a level 1 subdivision created all four-sided polygons, what this will result in is that your model will appear to have four times the number of polygons as the preceding level.
You’ll also notice that at a subdivision level of two, the outer edges of the polygon appear much smoother and rounder. This is most noticeable in the four-sided polygon. Where it originally appeared as a rectangular shape, it is now more like a circle.
How to use Subdivision
In order to subdivide a figure in Poser, you need to access the pull-down menu for the figure on your Menu Bar and from there you will be able to choose the Skinning Method and make sure Poser Unimesh is checked.
Next, select the Body of your figure and in the Properties tab you will find the sliders for Subdivision Levels for both the Preview and Render. The Preview level will enable you to see the mesh as it becomes smoother and you can decide which level is best. You can then lower the Preview level or even set it to 0 and just leave it on for the Render so that it won't slow down navigation within your scene. This is especially the case with heavily populated scenes. Don't forget to set subdivision for any props as well. Dynamic cloth props will benefit from subdivision as any shading artifacts can be reduced and the cloth will be smoother.
Depending on the model you may want to choose a level 1 or 2 of subdivision as going higher may not make much of a difference or not be possible, in which case you will get a message warning you that at that level, subdivision will result in very high polygon counts.
Most newer products that have been modeled with fewer polygons in order to take advantage of subdivision may have already been set to subdivide but, if not, then after you assign the desired levels of subdivision you can re-save them in your library so you don't have to go through the same process again.


