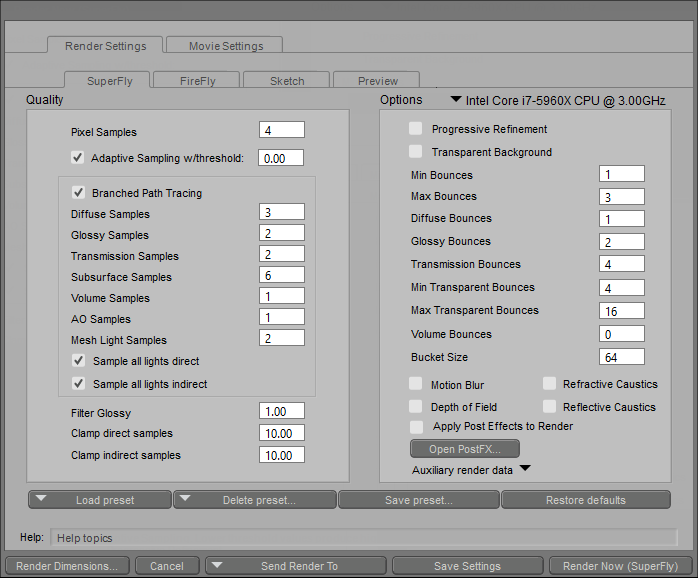
With default settings, you may see areas that don’t appear as sharp as they should, or which show some artifacts and blurriness in reflections. The quality settings will help you control how the light passes to and between the objects in your scene.
In general, increasing the number of samples or the number of bounces that are taken during the rendering process increases the quality of the render; however higher settings also increase the amount of time required to complete the rendered image.
Here are the top three things to know when using the SuperFly Render Settings.
What are Pixel Samples?
Pixel samples is the most important piece in SuperFly's Render Settings.
This setting is the one that determines the trade-off between render quality and render speed. The pixel samples setting controls the number of paths to trace for each pixel.
The main thing to know is that the numbers can be misleading. The default setting is four for Pixel Samples. That doesn't mean it renders pixels at four. Instead, Poser renders at the square of that number of samples, therefore four really means 16, 8 means 64, and so on.
Higher values increase the overall quality of the render, but will also increase render times. Increasing the pixel samples reduces graininess in reflective and refractive light.
What is Adaptive Sampling?
You can speed up your render time by setting the Adaptive Sampling. This helps speed up render times by examining changes as each render sample is made.
In short, Adaptive Sampling focuses the render engine's energy on the parts of your render that need the most computing power. By using machine learning, it shortens render times by focusing on the areas that need the most work.
When rendering an image with Adaptive Sampling turned on, SuperFly will work on a group of pixels, the number of which you designate, until it detects that any additional bounces will produce little to no change in the render quality of the current area. Then it moves to the next group of pixels, called a "bucket." The number of pixels in each area is determined by the "Bucket Size" requirement in the Render Settings tab.
Adaptive Sampling applies to both CPU and GPU rendering by controlling render properties and quality when using the SuperFly render engine.
Learn more about Adaptive Sampling in this tutorial.
Then you can use the denoising filter found in PostFX to remove noise at the end of the render. This allows you to perform renders with a lower number of pixel samples (which will render faster) and then apply denoising after the render is finished.
How to use Branched Path Tracing
When Branched Path Tracing is turned on, you can throttle back on the Pixel Samples setting and then adjust each type of sampling individually to achieve the desired render results.
Branched Path Tracing allows more control over the number of samples taken for different types of materials.
The Pixel Samples setting will be multiplied by the individualized values entered for Diffuse, Glossy, Transmission, Subsurface Scattering, Volume, Ambient Occlusion, and Mesh Lights. This allows you to fine-tune a higher value of samples on an “as needed” basis that is applicable to the contents in yours scene.
When rendering with your GPU video card, we recommend turning Branched Path Tracing off, increasing pixel sample settings, and setting bounces as needed for the contents in your scene.
When rendering using your CPU, reduce the Pixel Sampling and use Branched Path Tracing because it can compute more in a single cycle and reduce your render time.
.png)


