Using the Animation Controls
Contents
The Animation controls are dockable and floatable. This palette contains the tools most commonly used when creating animations. They allow you to add and edit keyframes and preview your animation. If the Animation controls do not appear on your screen, choose Window > Animation Controls and place them where you find it most convenient (generally the top or bottom of your document window is the common location). The Animation controls appear as follows, and consists of the controls described in the following sections:
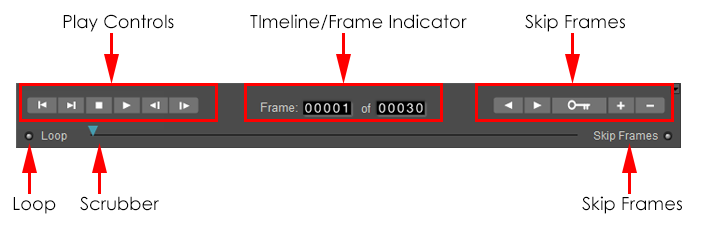
Animation Controls.
Play Controls
The Play controls appear on the left side of the Animation controls and allow you to preview your animation using VCR-like controls. From left to right, the Play controls are as follows:
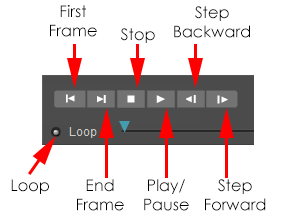
The Play Controls.
- First Frame: Clicking the First Frame button moves to the first frame in your animation.
- End Frame: Clicking the End Frame button moves to the last frame in your animation.
- Stop: Clicking the Stop button stops animation playback at the current frame.
- Play/Pause: Clicking the Play button plays your animation at normal speed, including background movies and sounds (if any). While your animation is playing, this button becomes the Pause button. Clicking it freezes the animation at the current frame.
- Step Backward: Clicking the Step Backward button moves back to the previous frame (i.e., the frame before the current one).
- Step Forward: Clicking the Step Forward button moves forward one frame (i.e., the frame after the current one).
- Loop: Checking the Loop radio button causes your animation to repeat itself continuously when playing until you click the Stop button.
Animation previews run in the Document. Be sure to select the appropriate tracking mode (see Tracking Mode).
Timeline/Frame Indicator
The center portion of the Animation controls displays the Timeline, which represents the total time of your animation in Poser. This timeline contains a pointer (Scrubber) representing the location of the current frame relative to the entire animation, which is visible in the Document. The Scrubber is very commonly used to quickly find specific points within animations. Click and drag the Scrubber to quickly navigate your animation.
Just above the Scrubber is the Frame Indicator, which indicates both the total number of frames in your animation and your current position within that timeline, with the left field indicating position and the right indicating animation length. For example, if the two numbers read 60 and 120, that means that you are viewing the 60th frame of an animation that is 120 frames long.
You can jump to a specific frame by clicking the left number field and entering the frame number you wish to jump to. You can also add or remove frames by clicking the right number field and entering the number of frames you wish in your animation. Entering a larger number lengthens your animation and vice versa. Shortening animations will cut the excess frames from the end. For example, if you reduce an animation from 120 to 90 frames, you will lose the final 30 frames.
Keyframe Controls
In most cases, Poser’s automatic animation engine records keyframes as you create animations. Sometimes, however, you’ll want to manually add keyframes, such as when camera animation is disabled. It is important for you to track the status of camera animation, as you could create a series of keyframes without realizing that the animation is off. As mentioned above, if camera animation is disabled, you must manually add keyframes in order to record them. You may also need to fine-tune animations, which may necessitate recording additional keyframes. For example, you could position the figure’s left foot at Frames 10 and 20, with Poser calculating its position for the tween frames. If you wanted to refine this, you could add a keyframe at Frame 15.
The Keyframe controls allow you to quickly and easily add, preview, and remove keyframes within your animation. From left to right, the Keyframe controls are:

The Keyframe Controls.
- Previous Keyframe: The Previous Keyframe button returns to the previous keyframe.
- Next Keyframe: The Next Keyframe button advances to the next keyframe.
- Edit Keyframes: Clicking the Edit Keyframes button opens the Animation Palette, discussed next.
- Add Key Frames: Clicking the Add Key Frames button adds a keyframe at the current frame number. For example, if you have existing keyframes at Frames 15 and 30, you could drag the Scrubber to Frame 22 and insert a keyframe by clicking the Add Key Frames button. You can also insert a keyframe by moving to any frame in your animation and making a change in your scene. This change will automatically be recorded as a new keyframe.
- Remove Key Frames: Clicking the Remove Key Frames button removes the currently selected keyframe. For example, if your character’s arm is over his head in Frame 1, down at Frame 15 and out to the side in Frame 30 and you remove the keyframe in Frame 15, the figure’s arm will move out to the side position specified in Frame 30 without dropping to the figure’s side. To delete a keyframe, use the Next Keyframe or Previous Keyframe buttons to locate your desired keyframe, then click the Remove Keyframe button.
- Skip Frames: Check this radio button to skip frames during playback. This helps conserve system resources while previewing your animation before you render it.
Keyframes View
The Keyframe controls in the are almost identical to their counterparts in the Animation controls. The main difference is that the keyframe controls in the Keyframes palette feature a button that allows you to open the Graph palette.
Recording Keyframes
Poser records changes made to figures, props, materials, etc. as keyframes. Create keyframes by moving the scrubber to a new point on the timeline and making your desired change(s) to your scene. Recorded keyframes store new body part positions, new prop positions, material settings, etc. for each figure and prop within your scene. You can only record one set of position parameter settings for any given keyframe. For example, if you select a frame and move a figure’s arm up then change your mind and move the arm down again, the downward position is what will be “remembered” and what will affect your animation. To make a figure’s arm wave up and down:
- Select a starting pose.
- Move the scrubber to the point in time/frame number you wish to edit.
- Raise the arm using the Editing tools.
- Move the scrubber to a later point in time/frame number.
- Lower the arm, again using the Editing tools.
- Continue creating keyframes until the motion sequence is complete.
Camera animation must be enabled for the currently selected camera In order to automatically record keyframes. The Animating option can be found in the Properties palette for the selected camera. If animation is disabled, you can add keyframes manually.