Using the Talk Designer
Poser’s Talk Designer automates the task of animating facial features for speech. The Talk Designer synchronizes morph targets, Emotional Tweak controls, and powerful eye and head motion modelling algorithms with your sound file, making it much easier to animate realistic facial expressions for speech.
The Talk Designer is configured using the Talk Designer palette. Choose Window > Talk Designer to open the palette.
Select File > Import > Lip Sync Audio to import a sound file, as described above. At the end of the import process, the Talk Designer palette will automatically open with your imported audio file selected.
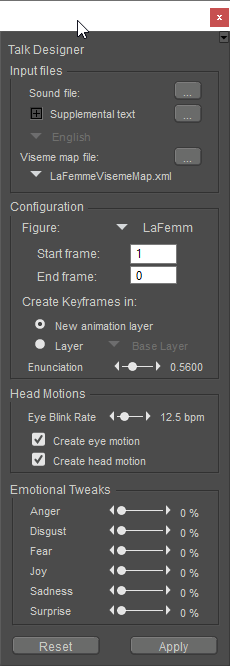
The Talk Designer.
Select Window > Talk Designer to open the Talk Designer palette at any time.
Configuring the Talk Designer
The Talk Designer palette settings are described in the following sections. When you have configured the Talk Designer to your satisfaction, click the Apply button at the bottom of the palette to generate a lip-sync animation based upon the settings you specified.
Input Files
- Sound file: Clicking the “...” button next to the Sound file setting allows you to browse to the location of the sound file you wish to use for your lip-sync animation. Poser supports WAV file, as well as AIFF files on the Macintosh.
Sounds used in the Talk Designer must be uncompressed, single-channel (mono) audio files in WAV (Windows) or AIFF (Mac) format. 22050 and 44100 kHz files are supported.
- Supplemental text: For better accuracy, we recommend that you include the text of the spoken words in the Supplemental text field. Text entries in this field will be required if you need to specify an alternative language. You can click the “...” button to browse to a text document, or click on the “+” button to open a text box and enter the text directly.
- Language: If you add supplemental text, use the Language pull-down menu to specify the language used. In order to select another option from the Language menu, you must have text entered in the Supplemental Text field. After entering your text, you will have the option to select English, French, German, or Japanese.
- Viseme map file: A viseme map file provides information about which phonemes (speech sounds) are matched to which specific visemes, or facial expressions. These viseme map files are directly linked to the morph target setup of the individual figure. If you are working with any of the newer figures included with Poser, you can simply use the default viseme map file for the figure. If you wish to use a figure from a previous version of Poser, please make sure that a viseme map is provided in the associated pop-up menu. If you use a figure from a third-party source that was created with a different morph target setup, you will need to provide the viseme map file that accompanies the figure. We recommend that you place the viseme map file into the \Runtime\LipSync\ folder that accompanies your Poser installation. Doing so will add the file to the pop-up menu in the Talk Designer palette. Alternately, you can click the “...” button to browse to the location of the viseme map file, if you wish to keep it in another location.
If you are unsure whether or not your custom figure was created following the morph target standards for included Poser figures, you can try your animation using the default viseme map file. Bondware, Inc. cannot support third-party figures. If you are dissatisfied with the results, you will need to contact the content creator.
Configuration
- Figure: Specify which figure in the scene you wish to use for the lip-sync animation, by selecting the name of the figure from the pop-up menu.
- Start frame: Specify the Start Frame number for the actual lip-sync animation. By default, the Start Frame setting is set to the Start Frame of the entire scene animation (frame 1).
- End frame: Specify the End Frame number for the actual lip-sync animation. By default, the End Frame setting is set to the End Frame of the entire scene animation (generally frame 30, unless you have specified a different scene End Frame). Once you load a sound file, the End Frame setting will default to match the length of the sound file.
If the End Frame number specified in the Talk Designer is greater than the End Frame for the entire scene animation (as specified on the Base Layer), then additional frames will be appended to the scene to accommodate the difference.
- Create Keyframes in: The Create Keyframes in setting allows you to select either a new or existing animation layer for your lip-sync animation keyframes. Animation layers allow you to organize your animations, save and reuse specific aspects of a larger animation.
We recommend that you create the keyframes in a new animation layer; click the “New animation layer” radio button to select this option. You will be asked to name the new layer. Alternately, you can choose to use an existing animation layer by clicking the “Layer” radio button, and selecting the name of the layer from the pop-up menu. If you do not wish to use animation layers, you can simply write all keyframes to the Base Layer. For more information about animation layers, please see Layers Tab.
- Enunciation: The Enunciation slider allows you to configure the degree to which the Talk Designer will adjust a figure’s visemes, or facial morphs, in response to changes in the audio file’s perceived energy. Poser automatically adjusts visemes to correlate to the energy of the selected sound file. However, you can use the Enunciation slider to raise or lower the degree of reaction, to counteract or supplement the automatic viseme adjustment. Move the slider to the right to increase enunciation, or to the left to decrease.
Head Motions
- Eye Blink Rate: The Talk Designer can add intermittent eye blinks that have been modeled on studies of actual human blink rates, in order to animate blinks realistically in relation to the animation of speech. The Eye Blink Rate slider allows you to specify an average blink rate, measured in blinks per minute (BPM). To change the average blink rate, simply click and drag the slider, or click on the numerical value in the text box and enter a number directly. The default value is 12.5 BPM. A setting of zero (0 BPM) disables the automatic blink feature, which means that with this setting you must animate all eye blinks manually.
- Create eye motion: When people speak, their eyes generally look in different directions with relation to their subject matter and surroundings. Adding eye movements can result in a more realistic animation. Check the Create eye motion checkbox to have Poser add eye movements to your lip-sync animation.
- Create head motion: People naturally move their heads during speech, which means that adding head motion to your animation can yield more realistic results. Check the Create head motion checkbox to have Poser add head motion to your lip-sync animation for you.
Emotional Tweaks
The Talk Designer includes six Emotional Tweaks, which are morph targets that can be used in conjunction with speech. These morph targets are based upon facial expressions associated with the following emotions:
- Anger
- Disgust
- Fear
- Joy
- Sadness
- Surprise
Each of these Emotional Tweaks is adjusted by a slider, which ranges between -100% and 100%. The values within this range represent the degree to which each particular emotion will manifest in the facial expressions of the figure during the lip-sync animation. Feel free to mix and match the Emotional Tweaks slider values to suit your specific needs. To adjust the values, you can either move the sliders to the right or left, or you can click on the numerical value to the right of the slider and enter a number directly.