Using the Walk Designer
Contents
Of the wide range of human motions, walking is among the hardest to simulate with any degree of accuracy. Walking looks simple: just place one foot in front of the other. In reality, however, it is an incredibly complex motion involving a variety of muscles in the legs, torso, arms– practically the entire body. Thus, creating an accurate walk simulation entails a great deal of precision posing. Poser’s Walk Designer allows you to bypass most of this and create a realistic walk using just a few simple steps.
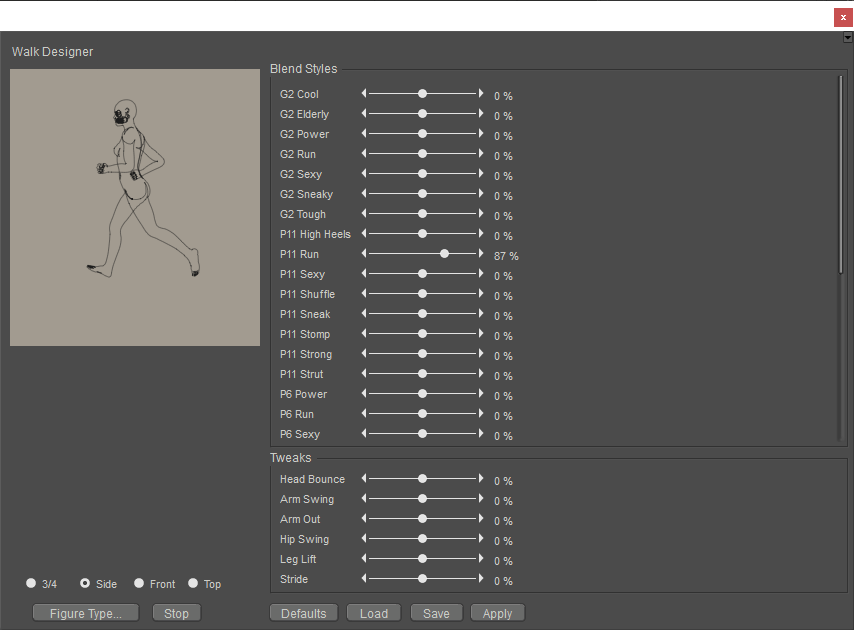
The Walk Designer.
Creating the Walk
To open the Walk Designer, select the figure you’d like to animate in the Poser scene, then choose the Window > Walk Designer menu command.
Unless you want your figure to walk in place (without a walk path), create a walk as follows:
- Create a walk path (your figure will follow this path when walking)
- Create a walk using the Walk Designer.
The Walk Designer has two sections. The upper set of controls creates the walk’s larger motions, while the lower set lets you set up the walk’s secondary motions. To preview a walk, click the Walk button at any time while using the Walk Designer. The preview will loop indefinitely and the button will change to Stop.
Views
As you can see in the previous graphic, the Walk Designer includes a real-time preview of the walk being created. As you change the parameters, the walk changes to reflect your updates. You can specify the angle from which to preview your walk by checking the appropriate radio button underneath the Preview tab:
- 3/4: Checking the radio button looks at the figure on an angle.
- Side: Checking the Side radio button looks at the figure’s side.
- Front: Checking the Front radio button looks at the figure’s front.
- Top: Checking the Top radio button looks down from the top.
The Walk Designer reflects your current Poser workspace’s foreground, background, and shadow colors, as well as tracking mode.
Figure Types
This step is optional, however it can address potential issues such as irregular or jerky motions in generated walks. To load a figure type, click the Load button in the Walk Designer and use the standard Open dialog to locate your desired character (*.CR2) file. Please see Poser File Structure for more information about Poser file types, including CR2 files.
Try loading the same figure you’re working on. For example, if creating a walk for the Don figure, load him into the Walk Designer for best results.
Blend & Tweak Styles
Once you've loaded your figure type, you can begin designing your walk. By default, the sliders are all in the middle of their ranges. This combination applies a workable default walk. Dragging a slide to the right increases its value and effect, and vice versa. To create a walk:
- Drag the Blend sliders to create the large motions. Use the preview to view all of the available settings. Try using combinations of several settings, and remember that small changes can produce dramatic results.
- Adjust the Tweak sliders to fine-tune the walk.
- When your walk looks the way you want it to, click the Done button to open the Apply Walk dialog (see below).
Clicking the Defaults button restores all sliders to their default positions.
Loading & Saving Walks
You can load and save walk files using the Walk Designer. This is not the same as saving animated poses to the Library palette.
- To save a walk, create it, then click the Save button to open a standard dialog box allowing you to specify the name and location for the saved walk. Select your desired path, enter a name for the saved walk, and click OK.
- To load a walk, click the Load button to open a standard Open dialog, allowing you to specify a path and filename for the walk file to load.
For greatest realism, load walks created using the same figure type.
Creating a Walk Path
Creating a walking figure is a two-step process. The first step entails creating a walk path for your selected figure that defines where s/he is going to walk. The figure can walk in place or along a path.
Walk paths are designed to work with the Walk Designer. While the Walk Designer specifies how your figure walks, a walk path specifies where. The path is a curve drawn in the Document that sets the figure’s course as it moves about the Poser workspace. Create the path, design the walk, and the figure walks along the path from start to end, stopping at the end.
To create a walk path, Select Figure > Create Walk Path. A default path appears in the Poser workspace. We recommend shifting to the Top camera and zooming out to get the best view of your scene and walk path, but you can work using any camera you like. The following image shows a default walk path.
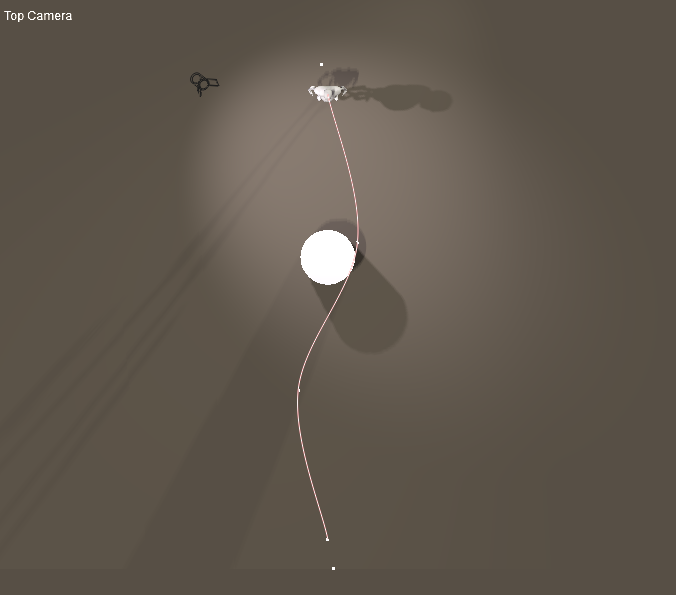
Default walk path.
Walk paths must be created on the ground plane.
Shaping Curves
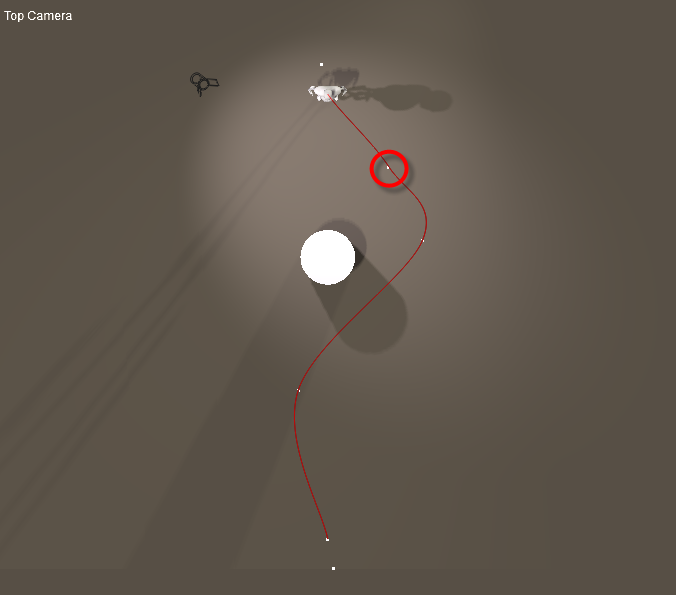
The curve’s position is defined using control points. Click and drag control points to shape your path any way you like.

Drag a control point to reshape the curve.
You can position the beginning and end of the walk path by dragging the end control points. You can also re-position the entire walk path by selecting the ring that appears when your cursor is near the walk path, which functions like the Figure Circle discussed in Selecting Body Parts.
Adding and Removing Control Points
To add control points, simply click anywhere along the line. Your new control points appear. Adding control points can add detail and/or lengthen your walk path.
You can add or remove points on the walk path.
To delete control points, press and hold Opt/ALT while clicking the point you wish to remove.
Once you have completed your walk path, use the Walk Designer to design a walk for your figure.
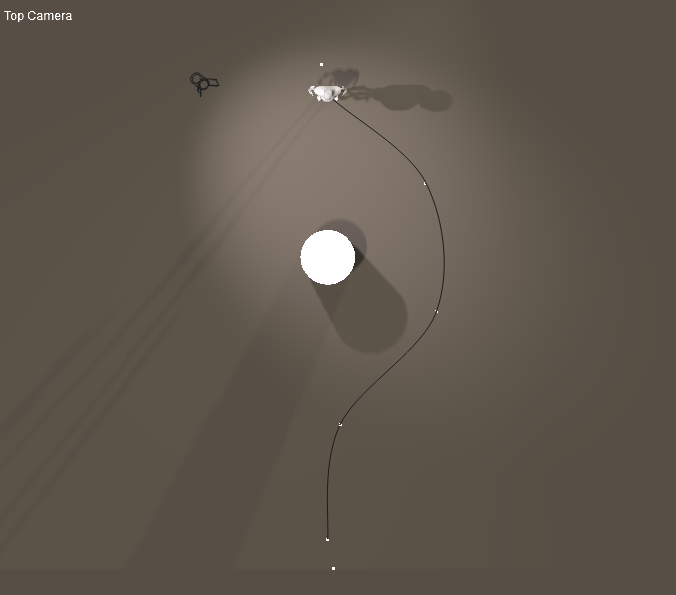
A reshaped walk path.
Because of the nature of the spline used for walk paths, it is impossible to create a hard right-angle turn. These and other abrupt direction changes can result in unnatural-looking walks.
Once you have created a walk using the Walk Designer, you can delete the walk path. The figure will still behave as though the walk path was present.
Applying Walks
Once you've created your walk, you need to apply it to the figure’s walk path. The Apply Walk dialog allows you to specify various options for applying your newly created walk. If you want your figure to walk in place, you can use this dialog without having a walk path.
You have the following options when applying walks:
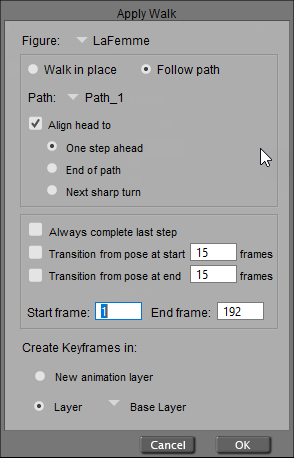
The Apply Walk dialog.
- Figure: If your scene has more than one figure in it, the Figure pull-down menu allows you to select the figure to apply the walk to.
- Walk in Place/Follow Path: Clicking the Walk in Place radio button causes the selected figure to walk in place without going anywhere. You can use this option to create a walk without a walk path. Alternately, if you wish your figure to follow a walk path, click the Follow Path radio button.
- Path: If your scene has more than one walk path, you can use the Path pull-down menu to specify the walk path to use.
- Align Head to: Checking the Align Head to box lets you control how the figure’s head acts as it moves along the walk path. One Step Ahead keeps the head aligned with the body and produces the most head movements. End of Path keeps the figure’s head looking at the end of the walk path no matter where it leads. Next Sharp Turn aligns the head to the turns in the walk path, the head only moving when the path curves.
- Always Complete Last Step: Checking the Always complete last step box forces the walk animation to complete within the allotted time. This is useful if the walk ends in mid-stride at the end.
- Transition From/To Pose at Start/End Frames: The Transition from pose at start and Transition from pose at end options allow your figure to smoothly transition into and out of the walk at the beginning and end of the walk cycle, respectively. When enabled, Poser interpolates between the figure’s pose at the start of the walk and the settings you specified in the Walk Designer, and vice versa at the end of the cycle. For example, you can use this feature to quickly set up a runner by posing the figure in the crouched starting position, designing a run, and specifying a realistic transition time. When you play your animation, the runner will come off the starting blocks and begin the run. Checking one or both boxes enables the specified option(s). Once enabled, enter the number of frames to be used for the transition. Longer time periods (more frames) allow more realistic movements and vice versa.
- Start Frame: Enter the frame in your animation where the walk will begin in the Start Frame field.
- End Frame: Enter the frame in your animation where the walk will end in the End Frame field. Poser suggests a value that is expected to yield a natural walk speed. The more frames allocated, the more time a figure will take to walk along the specified path.
- Create Keyframes in: The Create Keyframes in setting allows you to select either a new or existing animation layer for your walk keyframes. Animation layers allow you to organize your animations, save and reuse specific aspects of a larger animation.
We recommend that you create the keyframes in a new animation layer; click the New animation layer radio button to select this option. Alternately, you can choose to use an existing animation layer by clicking the Layer radio button, and selecting the name of the layer from the pop-up menu. If you do not wish to use animation layers, you can simply write all keyframes to the Base Layer. For more information about animation layers, please see Layers Tab.