Working with Keyframes
Contents
Editing Keyframes on the Timeline
You can use the Timeline to select, add, edit, or delete keyframes. The Timeline appears as a grid that displays keyframes for each element in your scene. Columns indicate time, with each column corresponding to a single animation frame or point in time (See Elements List/Timeline). The Ruler at the top of this area indicates whether the columns indicate frames or points in time. Each row corresponds to an element in your scene. As described above, the Timeline presents information using color codes. Use the horizontal and/or vertical scrollbars to navigate the Timeline if necessary.
Selecting Keyframes
By default, Poser selects the first frame in your animation (Frame 1) when you open the Animation palette. You can select any frame by clicking in or above its column. You can also enter a number in the Frame field. When you select a keyframe, Poser displays the current element’s row and time column, creating an intersection.
Selecting a different keyframe moves the intersection to the newly selected point. To select a keyframe, click any one of the light green squares on the Timeline grid.
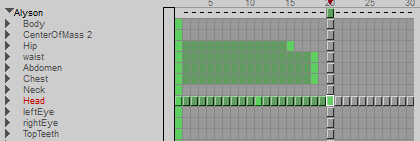
Selecting Keyframes.
Adding & Removing Keyframes
Adding keyframes stores a specific pose and/or saves a Poser-created interpolation (tween) frame. You can add keyframes for the entire scene or the selected element by checking either the This Element or All Elements radio button as described in This Element/All Elements. When This Element is selected, keyframes are only recorded for your currently selected element. When All Elements is selected, keyframes are recorded for every element in your scene. To add a keyframe:
- Select This Element or All Elements, as appropriate.
- Select the frame or point in time where you wish to add the keyframe.
- Click the Add Keyframes button.
Removing Individual Keyframes
Removing keyframes can modify how your animation appears. You can clear a keyframe for a specific element or your entire scene by selecting This Element or All Elements, as appropriate. Removing a keyframe does not delete the frame, but removes the saved information. To remove a keyframe:
- Select This Element or All Elements, as appropriate.
- Select the frame or point in time where you wish to remove the keyframe.
- Click the Delete Keyframes button.
Removing Multiple Keyframes
To remove an entire range of keyframes, click and drag over the keyframes you wish to delete in the Timeline and press [DEL]. To remove multiple specific keyframes, press and hold Shift while selecting individual keyframes, then press [DEL].
Moving Keyframes
While creating animations, you may decide to have one or more keyframes occur earlier or later than your present settings. You may also want to apply the settings in some keyframes to others. Poser allows you to move both individual and multiple keyframes. To do this, click the keyframe you wish to move and drag the colored cell horizontally to its new location. To move multiple keyframes, select them and drag your selection to its new location on the timeline.
Copying Keyframes
You can copy keyframes, figure parts, and parameters appearing in the Element List. By doing this, you can (for example) have several Poser figures marching in perfect step. Although Poser does not limit how you copy and paste keyframes, you should avoid mixing data (such as copying Scale parameter settings to a Rotation parameter). You can also obtain unexpected results by copying movements from one side of a body to another. If you do copy parameters from side to side, you will need to make the affected parameters negative on the side you copied to.
Choose Edit > Copy or press [COMMAND]/[CTRL]+[C] to copy frames to your clipboard. When you reach your destination, select Edit > Paste or press [COMMAND]/[CTRL]+[V].
Alternatively, you can click the desired keyframe then press and hold Opt/ALT while dragging the keyframe to its new location. You can move multiple keyframes by selecting them and Opt/ALT+dragging your selection to its new location.
Retiming Keyframes
Selecting Animation > Retime Animation opens the Retime Animation dialog, which allows you to adjust keyframe timing in your animation.
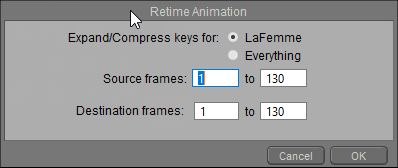
The Retime Animation dialog.
By specifying source and destination frame ranges, you can change the amount of time a motion or motions take to occur. This command does not destroy any keyframes, meaning that you can use it to repeat motions by copying them from one time to another. Selecting a motion in one area and selecting a non-overlapping destination re-maps the motion to another time without deleting the original motion.
To retime keyframes:
- Open the Retime Animation dialog box.
- You will be given a choice to retime keys for the currently selected figure or prop, or everything.
- Enter the start and end frames for the section of animation you want to retime in the Source Frames fields.
- Enter the range of frames to retime the animation to in the Destination Frames fields. If the destination range is longer than the source range, the animation is expanded or slows down, and vice versa.
- Click OK when finished.
When using this command, all existing keyframes in the Destination Range are deleted.
Resampling Key Frames
Selecting Animation > Resample Key Frames opens the Resample Keys window, which allows you to increase or decrease the number of keyframes in your animation.
This window has the following options:
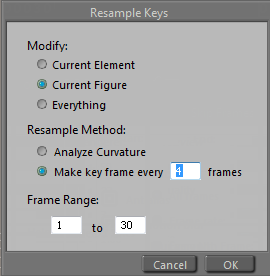
The Resample Keys dialog.
- Modify: Check the appropriate radio button to sample keyframes for the Current Element (prop, body part, etc.), Current Figure (entire figure), or Everything (entire scene).
- Resample Method: You have two options for resampling keyframes:
- Analyze Curvature: Causes Poser to examine the amount of curvature (change over time) in your animation and automatically assign new keyframes.
- Make key frame every X frames: Check this radio button and enter a value in the Frames field to create a keyframe every X frames, where X is the value you entered in the field.
- Frame Range: If you want to resample key frames in a specific portion of your animation, enter the start frame and end frame in the Frame Range fields.