Step Three: Styling Hair
Now that you’ve grown the guide hairs and set some basic parameters for how the hair will look, your next step is to style the hair the way you want it. You can do this by setting the included styling parameters and/or by using the Hair Edit tool.
You can use the Hair Edit tool at any time after growing hair, although we recommend that you complete the previous step. Please see the following subsection for information on using the Hair Edit tool.
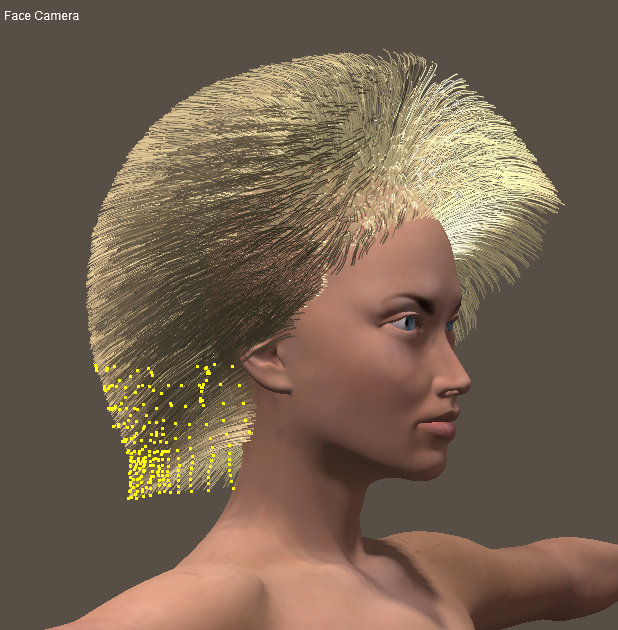
You can toggle the Show Populated function on and off while you work to check your results as you go.
The hair styling parameters are as follows:
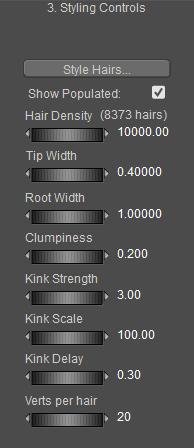
Styling Controls.
- Show Populated: Checking the Show Populated checkbox displays both the guide hairs and the population hairs. This will show you exactly how the hair will look, but does increase display refresh time. The status of this box will not affect population of hair in the final render. Hair will always appear populated in a FireFly render.
In order to see Hair Density (below) you must enable Show Populated. If this option is not enabled, you will only be seeing the guide hairs.
- Hair Density: The Hair Density parameter controls the total number of hairs in the group. The number of hairs are displayed next to the dial’s label. Increasing this number makes the hair fuller and more lush. The ability to control the total number of hairs is a powerful feature since it allows you to create custom effects, however the total number of hairs can impact rendering and redraw times. Experiment with this number to get optimum coverage without adding too many hairs.
Note that there is a fixed minimum density of 1 PNU (Poser Native Unit). If you reduce the Hair Density value to a setting that is below the fixed value, the number of hairs on the polygons will not change, even if the number of hairs in parentheses are showing 0 hairs. The fixed minimum density is overriding the Hair Density value that is entered in that case.
But the number of populated hairs can vary, depending on the units that you display your scene in. For example, if your preferred units are set to feet, and the hair group is one square foot, setting the hair density to 144 will produce 144 hairs. But if you set your preferred units to inches, a value of 1 will give you that same 144 hairs per square foot.
When you use small preferred units (like mm or inches), the dial will appear to go to zero, but hairs will still be grown. When Preferences are set to Poser Native Units, the dial's minimum limit is 1.
The number displayed in parentheses should be the approximate number of additional hairs in the hair group that you have selected.
As a matter of trivia, there are roughly 100-150 hairs in eyelashes per lid, roughly 500-1,000 hairs on each brow, and roughly 100,000 to 150,000 hairs on the head.
- Tip Width: The Tip Width parameter controls the hairs’ widths (diameters) at their tips. Hair usually thins somewhat as it progresses from root to tip, so this number will typically be less than the Root Width parameter, below.
- Root Width: The Root Width parameter controls the hairs’ widths (diameters) at their roots. Hair usually thins somewhat as it progresses from root to tip, so this number will typically be larger than the Tip Width parameter, above.
- Clumpiness: The Clumpiness parameter determines the hairs’ tendency to form dreadlock-like bunches.
- Kink Strength: The Kink Strength parameter is the measure of how wavy/curly hair is. Increasing this value increase the hairs’ waviness, and vice versa.
- Kink Scale: The Kink Scale parameter determines the size of hair waves/curls. Increasing this value increase the hairs’ waviness, and vice versa.
- Kink Delay: The Kink Delay parameter specifies the distance from the root at which the hair begins to curl/wave. Increasing this value increase the distance from the root, and vice versa.
- Verts Per Hair: The Verts per hair parameter controls how many vertex points are in each strand of hair. Increasing this value results in smoother, more flowing hair but increases the system resources needed to render/redraw your scene.
- Style Hairs: Clicking the Style Hairs button selects the Hair Select tool and opens the Hair Style Tool palette (see below).
Using the Hair Edit Tool/Palette
The Hair Select tool is only available in the Hair room. It allows you to directly edit guide hairs and create a nearly infinite variety of hair styles (parts, tails, etc.). You can access it by either selecting it in the Editing tools or by clicking the Hair Select button as described above. The Hair Style Tool palette appears as follows:
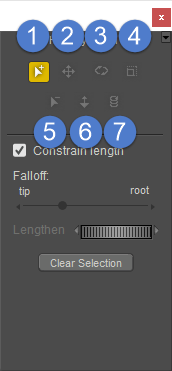
Hair Styling tools.
You have the following controls available for directly manipulating guide hairs:
- Add Hairs to Selection: Select the Select Hairs tool, then click and drag a rectangle around the guide hairs you wish to select for further styling. Unselected guide hairs are not affected by the Hair Edit tools. Selected hairs are all affected equally. Selecting more guide hairs can be faster, however you can select as few as one hair for precise control over the style.
You can style selected hairs in the hair group.
For finer control over which hairs are selected, try switching cameras or using the Magnifier tool to zoom in close.
Hair growth is based on the parent object’s polygon count. If you wish to add detailed hair groups to a low-poly prop or to a portion of a figure with a low poly count, you can spawn a prop of the area you wish to grow hair on, subdivide that prop in your favorite 3d modeling application, then re-import the prop and apply it where needed. This is the same idea as skullcaps except that you are not limited to heads.
- Translate Hairs: The Translate Hairs tool moves the selected hair vertically around or laterally around the camera’s X and Y axes depending how you drag. The translation may occur on the hair’s X, Y, and or Z-axes depending on the position of the camera relative to the hair.
- Curl Hairs: The Curl Hairs tool bends a guide hair. Hair rotation works in three dimensions, allowing you to make a lot of progress very quickly. Dragging perpendicular to the hair rotates it up and down (relative to your point of view). Dragging parallel to the hair rotates it in and out, again relative to your point of view.
- Scale Hairs: The Scale Hairs tool allows you to scale the selected hair along the camera’s X and Y axes. The hair’s affected axes will vary depending on the camera’s position relative to that item. Dragging in towards the root reduces the scale, and dragging away from the root increases the scale. Dragging laterally scales hair in two dimensions, and dragging vertically scales hair in the third dimension. The axes affected depend on your currently selected camera position. You can also press and hold Shift while using this tool to scale the selected hair(s) evenly in all three dimensions.
- Remove Hairs from Selection: Select the Deselect Hairs tool, or simply hold down the [CTRL] key, then click and drag a rectangle around the guide hairs you wish to deselect from further styling. The Hair Edit tools do not affect unselected guide hairs.
- Translate In/Out: The Translate Hairs In-Out tool moves the selected hair(s) along the Camera’s Z axis (in and out). This translation may take place along the hair’s X, Y, and/or Z axes. Dragging down pulls the hair towards you, and vice versa.
- Twist: The Twist Hairs tool rotates selected hair(s) along their own axis.
In addition to the editing tools, the palette has the following controls:
- Constrain Length: Checking the Constrain Length checkbox forces all selected guide hairs to retain their current lengths no matter how you use the hair editing tools. Clearing this box allows the length to vary depending on how you use the hair editing tools (for example, you could use the Hair Translate tool to lengthen some guide hairs to create a ponytail.
- Falloff: The Falloff slider controls the portion of the hair affected by the styling. Moving the slider to the left causes the tools to only act near the tip of the hair. Moving the slider to the right causes the styling tools to affect more of the hair’s length. With the slider all the way to the right, the entire hair is affected from root to tip.
- Lengthen: Moving the Lengthen dial to the right lengthens the selected guide hairs and vice versa.
- Clear Selection: Clicking the Clear Selection button deselects all selected guide hairs.
To exit this tool, either click the Close box on the palette’s upper right-hand corner or select another Editing tool.
The Hair Edit tools do not affect figures or props in your scene, and the Document Editing tools do not affect hair.