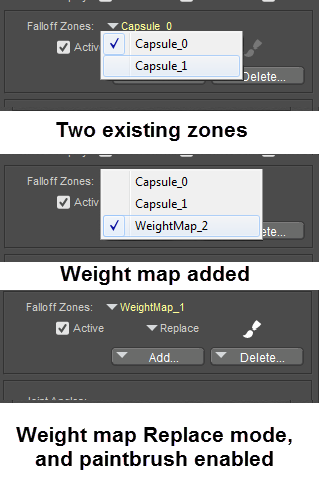
Adding a Weight Map
After you finish setting up the spherical or capsule falloff zones, you can collapse them down into a Weight Map for the selected joint. When you click the Add button, you will see two options for Weight Maps:

There are two options for creating weight maps.
- Add Weight Map: Choose this option to add a new weight map in addition to any existing falloff zones that may already appear for the selected body part. It will work similarly to any other falloff zone.
- Merge Zones to Weight Map: Choose this option to merge existing falloff zones, including joint angles, into a new weight map. This is probably the most useful way to begin with your weight map. You will see a new weight map in the Zones list, but the original falloff zones will still appear in the list as well. The blend type for the weight map will be set to Replace.
You don’t have to have spherical or capsule falloff zones to create a weight map. You can just create one by selecting a body part, and then choosing Merge Zones to Weight Map. This will create a new weight map based on the existing inclusion and exclusion angles set for the body part. Then you can begin painting the weight map as needed.
Merging existing zones into a weight map.
Falloff zones are processed in the order in which they appear in the Falloff Zones list. Therefore, if you have a Spherical falloff zone at the top, a Capsule Zone second, and a Weight Map third, the Capsule zone will override the effect of the Spherical zone. Then the Weight Map, if set to Replace, will combine the effect of both the Spherical and Capsule weight maps, making the first two falloff zones ineffective. In addition the weight map will also replace the Joint Angle settings, making them ineffective as well. The joint angles will still be visible as a visual guide only.
In practice, you can configure a weight map to work with existing falloff zones by setting the blend mode to Add or Replace. However, there is no advantage to doing so. Falloff zones that have been collapsed down into weight maps work equally as well as the falloff zones that were initially used to create them.
If the previous falloff zones utilized bulge settings, they will still be active and you will still be able to adjust them in the Joint Editor.
In the Joint Editor, click the Add button, and choose Merge Zones to Weight Map. The weight map will be set to Replace, which will make the spherical and capsule falloff zones ineffective.
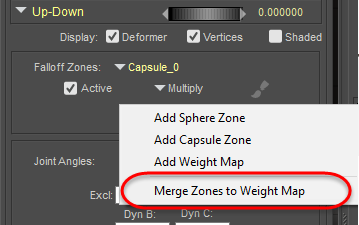
Merging existing zones into a weight map.