Painting Weights
After you collapse your weight maps down, you can start to paint. Click the Paint palette icon in the Joint Editor to display the painting controls. As you paint, the changes reflect changes to the actual edge flow and surface normals in the model, and not relative to the screen.
After you create a Weight Map, the Weight Painting tool is enabled in the Joint Editor.
When weight painting, consider the following general workflow:
- Make sure that the Active option is checked before you start painting. With this option off, the brushes will have no effect.
- Start with a smoothing brush, and start with a magnitude setting of 1 for larger areas, and lower the setting for smaller areas. Smooth the vertices in the joint, but be careful not to oversmooth.
- Watch your brush size. Use lower settings for tight areas, such as those between toes or fingers.
- After you smooth out the vertices, choose the Add or Subtract mode. Add will increase the weighted effect on the vertices, while Subtract will decrease the weighted effect. Darker colors (darker purple) are the least weighted vertices, and solid green are most weighted. Colors in between have varied weights.
To paint weights:
- Click the paintbrush icon to enable the painting tools. The Joint Editor shows the brush controls.
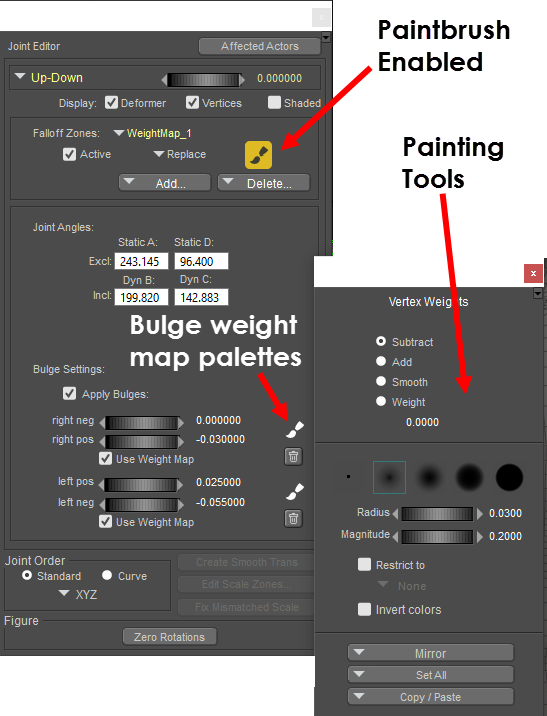
Paintbrush tools.
- Select a brush type from the available choices.
- The first brush is a hard brush with a very small radius, suitable for working with targeted vertices.
- The other brushes provide varying levels of hardness around the edges. The default brush has a softer edge which provides the most effect in the center and then gradually falls off to little or no effect on the outer edges. The last brush has no falloff at all, and applies strength evenly across the width of the brush. There are five brushes in the section.
The fourth brush will give you the best results, as it has a very slight feathering to the edge. If you use brushes that are more feathered you may throw off the weight balance.
- A wireframe preview of the brush appears in the Document. You can toggle this preview on or off by checking or unchecking the Display Brush option in the Joint Editor.
- The inner ring of the preview shows the area that will have the most effect.
- The outer ring of the preview shows the overall width of the brush. You can use the Radius setting in the Joint Editor to increase or decrease the brush width.
- Adjust the Magnitude setting in the Joint Editor to increase or decrease the strength of the brush. Decrease the setting to produce less of a change while you paint, and increase the setting to produce more of a change.
When you have the paintbrush set to Add or Subtract mode, pay attention to the Magnitude setting of the brush. Setting this too high (such as 1) will affect the vertices more than you want them to. It is recommended that you start with a low magnitude (around .007). Then slowly go back and forth over the areas you want to change.
- Use the Parameter dial in the Joint Editor palette to pose the body part in something other than the default position (at or near one of the limits is a good place to start).

Pose your body part while you paint across vertices to add, remove, or smooth the amount of effect on the vertices.
- Choose a method for painting. As you paint, observe how the changes affect the body part in that pose. The shape of the mesh will respond to the brush as you make changes:
You can also use single-key shortcuts during weight painting:
1=Add, 2=Subtract, 3=Smooth, 4=Weight, and 5=Brush Size
- Add will increase the effect of the polygons you paint, moving the painted vertices more toward the “green” (fully effected) color. This adds more effect to the areas painted.
- Remove will decrease the effect of the polygons you paint, moving the painted vertices more toward the red (little to no effect) color. This removes the effect from the areas painted
- Smooth will blend the sharp contrasts between polygons that are affected least against those affected the most.
- Weight: The Weight brush allows you to paint weight vertices while targeting a specific weight value. Click the Eyedropper to select a vertex. The weight of that vertex will appear in the text field and will be used as a target. When you paint with the Add brush, it will increase the weight values that are below the target setting until the target threshold is met. When you paint with the Subtract brush, it will decrease weight values that are above the setting until the target threshold is met.
The Smooth mode is extremely helpful. You can work at higher magnitudes, and it is beneficial to begin your weight painting with a smoothing brush to smooth out the mesh.
Vertices move as you paint them.
- As you are painting, use the Parameter dial to test various positions of the joint to make sure that the weight painting produces desirable results. Continue to adjust the weights until you are satisfied with the results as the joint is exercised through its limits.
- Click the Paintbrush icon to turn weight painting off. You will return to the normal Joint Editor palette.
Mirroring Weights
Tips on mirroring weight maps:- To mirror weights on body parts that have a center line (such as head, neck, chest, abdomen, waist, or hip), paint the weights on one side of the figure (left side recommended). Then click the Mirror button at the bottom of the Vertex Weights palette. To mirror left to right, select the +x to -x option.
- When mirroring bulge maps for center line actors, paint the bulge map on one side (left side recommended). Click the Copy/Paste button at the bottom of the Vertex Weights palette, and choose Copy. Click the button again and choose Paste/Mirrored and select the X axis.
- To mirror weights and bulge maps on body parts that do not have a center line (such as collars, shoulders, hand parts, thighs, shins, and feet parts), first paint weights on one side (such as the left leg). Then use the appropriate Figure > Rig Symmetry > subcommand to mirror the weights to the opposite body part.