Creating Subdivision Level Morphs
The Morph Palette includes a new feature that allows you to sculpt morphs at higher subdivisions. The easiest way to illustrate the principles of subdivision level morphs is to start with a simple square prop, which you can find in the Content Library. Follow these steps:
Start a new Poser scene and delete the default figure.
Choose the Props category in the Poser Library, and select the Square prop (not the Square Hi-Res prop) from the from the Props > Poser 12 Content > Primitives library. Click the Add to Scene icon.
Scale the square prop up to 1000% so that you can see it more easily in the scene.
Switch to Texture Shaded with Lines display style.
This square has only four vertices, one in each corner of the square. If you try to paint a morph in the middle of the square, nothing will happen because there are no vertices to move. You’ll need to subdivide the square so that you have more vertices to morph. In the Properties palette, set the Subdivision Levels for the square to 6.
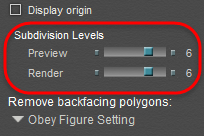
Set subdivision levels of the square to 6.
At the bottom of the morph palette you’ll notice a new setting called Bake down for subdivision.
Check this option if you want the morph that you paint on level 6 to affect the vertices at lower subdivision levels. If the lower subdivision levels have vertices in the same areas that you paint on, they will also be affected by the morph.
For purposes of this example, make sure that the Bake down for subdivision setting is checked.
The subdivision level settings for high resolution morphs will vary depending on the geometry of the figure that you are morphing. In the case of this square we are starting with an object that is only a single polygon, so in order to see the effects of the high resolution morph you have to set the values high. For figures and other Poser content, a setting of 2 or 3 will probably be a sufficient place to start because the geometry is typically more dense.
Uncheck the option if you only want the morph to affect the current or higher level(s) of subdivision.
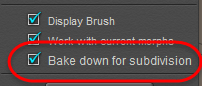
Bake down for subdivision option.
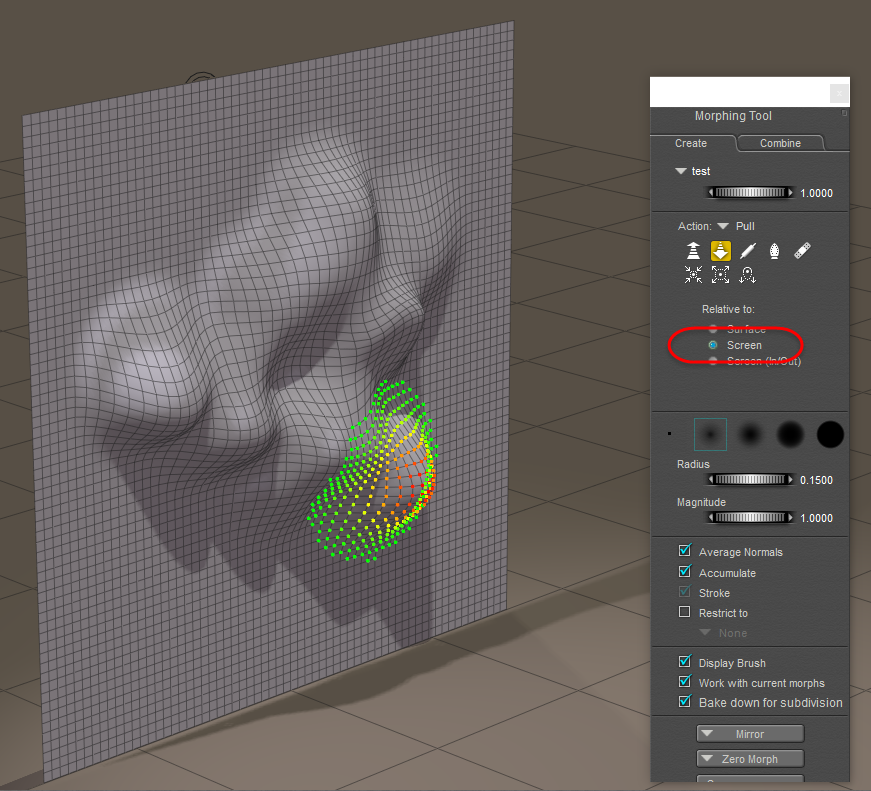
Switch to the Morphing Tool, and select the Pull morphing tool. Change the Relative to painting mode to Screen. Click near the middle of the square and start pulling vertices out toward you.
The Stroke option is disabled when you are painting in Screen mode. This makes it more intuitive to move the vertices that you initially clicked.
Adding a Level 5 morph.
After you pull enough vertices out, go back to the Properties palette and dial the Preview subdivision level down through each lower level (5 through 0) to observe how your painting affects the square at the lower subdivision levels. You’ll probably notice that the effect of the high resolution morph is barely noticeable at levels 2 and below, because there aren’t enough vertices in the square to have any effect at the lower levels.
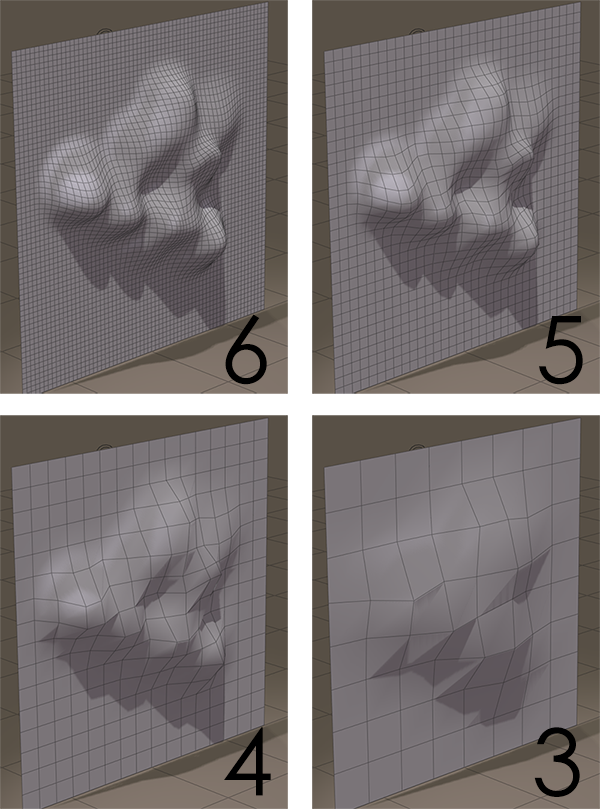
Dialing the Preview subdivision level down to see the morph at lower levels.
Now dial both the Preview and Render subdivision levels up to 7. We’ll make a quick change at this higher level. The first thing that you will notice is that the morph you painted at Level 6 is still intact and has been smoothed out a little more at the higher level.
Uncheck the Bake down for subdivision option so that you only create a morph on this level. Paint in another area on the square so that the new morph is noticeable. In the screen shot below, four spikes are added to the square.
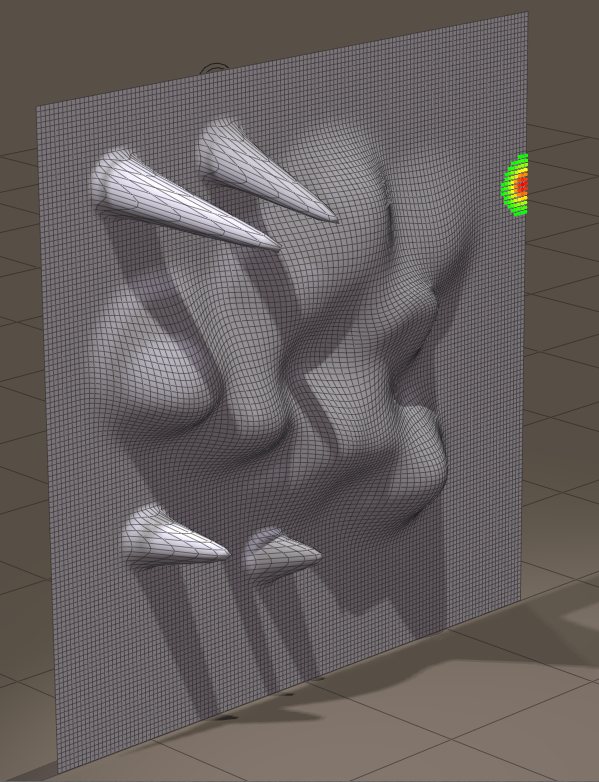
Some spikes added on Level 7.
After you finish your Level 7 changes, dial the Preview subdivision level down to 6. You’ll notice that your spikes (or whatever you painted) disappear, because you had the Bake down for subdivision setting turned off when you painted the Level 7 morph.
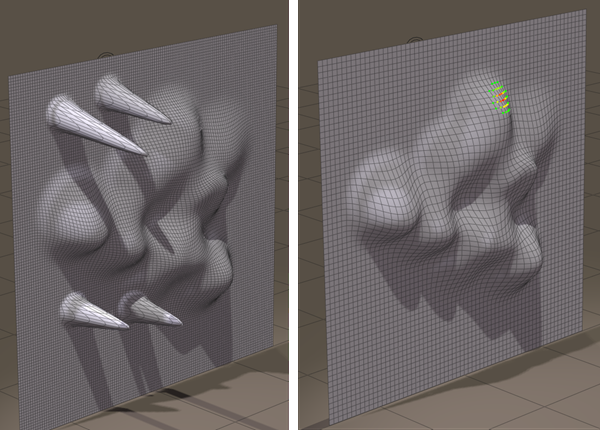
The Level 7 spikes (left) disappear at Level 6 (right) because you didn’t bake the Level 7 morph down to the lower levels.
Morph deltas are added sequentially. In other words, if you paint something at subdivision level 2, you will also see the morph working at level 3 and higher. Morphs painted at lower levels will affect higher levels. Higher levels, on the other hand, are independent. For example, if you add detail at Level 5 when the Bake down for subdivision setting is off, and then dial subdivision down to Level 4 or lower, you will not see the Level 5 morph affecting the lower levels.
If you need to undo the morph that you have created, the Zero Morph function has been enhanced to work on all levels, or on the current level: Try these steps:
Dial the Preview subdivision level back to 7, and click the Zero Morph button at the bottom of the morph palette. Choose Zero this level only.
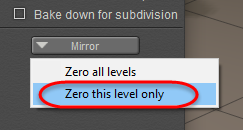
You can zero a morph on the current subdivision level, or on all levels.
The first morph that you painted was on Level 6. Go one level lower than that (Level 5), and choose Zero this level only. What you’ll notice is that the morph doesn’t completely go away, because the morph was created one level higher. Instead, what you are taking away on Level 5 is the blend between Level 6 and Level 4. Deleting the blended morph at level 5 doesn’t completely remove the morph from Level 5 and below, but the influence of that intermediate level is gone and the morph at that level and below are not as strong as they originally were.
To remove the morph completely, go back to Level 6, where you created the original morph. Then click the Zero Morph button and choose Zero All Levels. The morph will be completely removed.