Additional Controls
The process of filling in the blanks between keyframes (the area known as tween frames) is called interpolation, and the frames between keyframes are called tweens. Interpolation determines how intermediate poses are created.
Poser supports four types of interpolation, which allows you to make subtle changes to your animations. Interpolation settings apply to a range of frames, meaning that you can use different interpolation methods at different intervals in your animation. The Interpolation controls allow you to specify the interpolation method.

Interpolation Controls.
From left to right, the buttons are:
Spline: Places tween poses and settings on a curve. Motion begins at one keyframe, accelerates to full velocity, and gradually slows down as it approaches the next keyframe. For example, if the first keyframe has an arm by a figure’s side and the second one has it raised, the arm will begin moving slowly, accelerate to a constant velocity, and slow as it reaches the second keyframe. This is not to say that the movement will be fast; actual speed of motion depends on the amount of change between keyframes and the number of tween frames. In our above example, having the second keyframe 5 frames from the first would make a very rapid motion, while having 100 frames would make a very slow motion. The key thing to remember is that this type of animation resembles a smooth curve and is normally the most realistic.
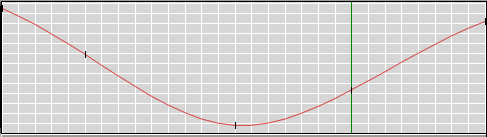
Spline Interpolation.
Linear: Takes the two keyframes and divides the motion between them equally with no acceleration or deceleration of the moving items. In the above example, the arm would move at a constant velocity from keyframe to keyframe. If you created a third keyframe with the arm back down, the change direction at the second keyframe would be abrupt.

Linear Interpolation.
Constant: This has no intermediate poses. If you set a series of poses with different keyframes, the first pose will be maintained until the second keyframe, at which point it will instantly change to the second pose, which will be maintained until the third keyframe, and so on.
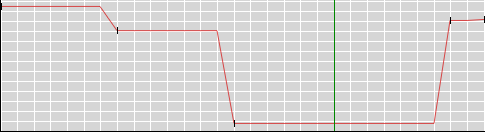
Constant Interpolation.
Break Spline: Stops interpolation at the selected point so you can begin a new interpolation style. This is useful for blending different interpolation styles. For example, a bouncing ball moves in a smooth arc until it hits the floor, at which point it undergoes an abrupt change in direction and speed. This is one scenario where changing interpolation styles can aid your animating work.

Breaking interpolation.
Clicking the Skip Frames radio button enabling this option drops frames when previewing your animation, speeding up playback. Click the button again to toggle its functionality off.
Clicking the Loop radio button causes your animation to repeat itself continuously when playing until you click the Stop button. Click the button again to toggle its functionality off.
This option selects whether changes made using the Keyframes (interpolation type, keyframe changes, etc.) apply to the entire scene or just to the selected element. Click the This Element or All Elements radio button, as appropriate, to make your selection.
![]()
Selecting elements to change.
The Elements List displays a list of all elements in your scene. The Timeline Area displays your animation frames and all of the keyframes stored for each body part/prop/material/etc. Keyframes appear in red, with tween (interpolated) frames appearing in different colors according to their interpolation type (see Selecting Interpolation Types). You can expand and collapse element listings by clicking the triangles next to elements in the list. Each element can be further expanded to display its properties and parameters that can be animated. For example, you can view the Scale and Transition elements for a figure’s forearm. The following image displays a portion of the Elements List for a scene.

The Element List.
To select an element, click it in the Element List. This selects the desired element in the same manner as clicking it in the Document, using the Current Actor menu or selecting it using any of the other available selection methods. Poser highlights the currently selected element in the Elements List as well as that element’s row in the Timeline. Use the vertical scroll bar on the right of the Elements List and expand and collapse branches to view all of the elements in your scene. Collapsing branches saves space in the display.
When you collapse an entire figure in the Elements List, the keyframes displayed will only be those pertaining to that figure’s location in the Poser workspace. You’ll need to expand the Elements List to show posing/parameter changes.
Double-clicking an element in the list, or selecting an element and clicking the Show Graph button, opens the Graph for the selected item. Please see Using Graphs.