Other Basic Operations
Contents
Creating a New Scene
Selecting File > New creates a new Poser scene. A dialog will appear if you have any unsaved changes in your previous scene. If this dialog appears:
- Selecting Yes opens a Save Poser Scene dialog box, allowing you to save your current Poser scene. After saving your current scene, the new scene will be created.
- Selecting No creates a new Poser scene without saving your unsaved changes. All unsaved changes will be lost, so use this option carefully!
- Selecting Cancel closes the dialog and cancels the new scene creation, leaving your current Poser scene open.
Opening a Scene
Selecting File > Open opens a standard Open dialog box, allowing you to access and work on a previously saved Poser scene file. You are prompted to save any unsaved changes in your current scene, if any (see above).
Opening a Recent File
Selecting File > Recent Files opens a pop-up list that displays a list of the ten most recent document files (.PZ3 or .PZZ formats) that you opened in Poser.
Closing Your Scene
Selecting File > Close closes your current Poser scene while leaving the Poser application running. You are prompted to save any unsaved changes in your current scene.
Saving a Scene
Selecting File > Save saves your current Poser scene using your previously specified filename and save location. If you have not previously saved your scene, Poser will open the standard Save As dialog box, allowing you to name and save your current Poser scene (see below).
Selecting File > Save As saves your current Poser scene allowing you to select a different filename and/or save location. This feature is useful for creating different versions of work, which allows you to return to any previous stage if you decide you don’t like your progress beyond a given save point. For example, you could save myscene_1.PZ3, then save new versions as myscene_2.PZ3, myscene_3.PZ3, and so forth.
Compressed File Support
Poser allows you to compress saved figures/props/scenes to save hard drive room. To enable compression support, select Edit > General Preferences, select the Library tab, and check the Use File Compression box as described in Setting Application Preferences.
See Poser Default File Locations for a table that lists uncompressed vs compressed Poser file extensions.
Reverting Changes
Selecting File > Revert allows you to undo your changes and reopen your current scene file in its last-saved state. This is a great way to do your recent changes over, however you will lose everything you’ve done since the last time you saved your scene. This is why we recommend that you save your scene often and, if you think you may want to return to an earlier version, to save progressive versions of your work using the Save As command. Clicking Cancel returns you to Poser, and clicking Revert proceeds to load the last saved version of your current scene.
You can also enable Auto Save options, as discussed in Document Preferences.
Run Python Script
Selecting File > Run Python Script opens a standard Open dialog, allowing you to browse for your desired PoserPython script. Once you locate your script, select it and click OK to execute it.
Page Setup
Selecting File > Page Setup opens a standard Print Setup dialog box allowing you to set up your printers. Please refer to your operating system and/or printer documentation for information on setting your print preferences.
Selecting File > Print sends your current scene to your selected printer. A standard Print dialog box opens allowing you to select your desired printer and general printing properties. Poser documents always print using the full page size. Please refer to your operating system documentation for information on selecting print options.
Exit
Selecting File > Exit closes Poser. You are prompted to save any unsaved changes. You can also type [COMMAND]/[CTRL]+[Q] to exit Poser.
This menu option is available for Windows only. For Macintosh, the Quit command appears on the Poser Application menu.
Undo
Selecting Edit > Undo reverses your most recent change to the actual scene. You can also press [COMMAND]/[CTRL]+[Z]. Undo applies only to alterations made within the actual scene; it is not applicable to changes made to application settings, Library content, etc.
Poser supports multiple levels of Undo. Selecting Edit > Undo repeatedly allows you to step backwards through your most recent document changes, reversing each change individually and reverting the scene to its previous state. Some operations within Poser will purge the Undo/Redo cache; a warning dialog will appear asking you to confirm before the action is implemented. Closing the file will purge the Undo/Redo cache.
You can specify the maximum size of the Undo stack. Please see Document Preferences for more information.
You can specify whether or not the Undo feature will apply to camera changes. Open the Properties palette for the currently selected camera, and check the “Remember changes for undo” checkbox in order to apply Undo to camera changes. Alternately, if you do not wish camera changes to be included in the Undo feature, make sure to uncheck this checkbox for each camera. This checkbox is active by default.
Redo
Selecting Edit > Redo reiterates the most recently undone action, thus reverting the scene to its previous state. You can also press [COMMAND]/[CTRL]+Shift+[Z]. To reverse a Redo action, simply select Edit > Undo again.
Cut
Selecting Edit > Cut removes the selected element(s) and places them in the system Clipboard for later pasting. You can also press [COMMAND]/[CTRL]+[X]. You can do this for poses and other functions.
Copy
Selecting Edit > Copy copies selected elements to the Clipboard. You can use this command to copy the position of one prop to another. You can also copy transformation and rotation channel information from the selected item and paste that information into another item. For example, the following figure shows pose information pasted from one character's right shoulder rotations pasted to the right shoulder of another character.
Copying and pasting poses from one side to the other does not mirror the poses. The same pose is applied. To mirror poses, use the Figure > Pose Symmetry function.
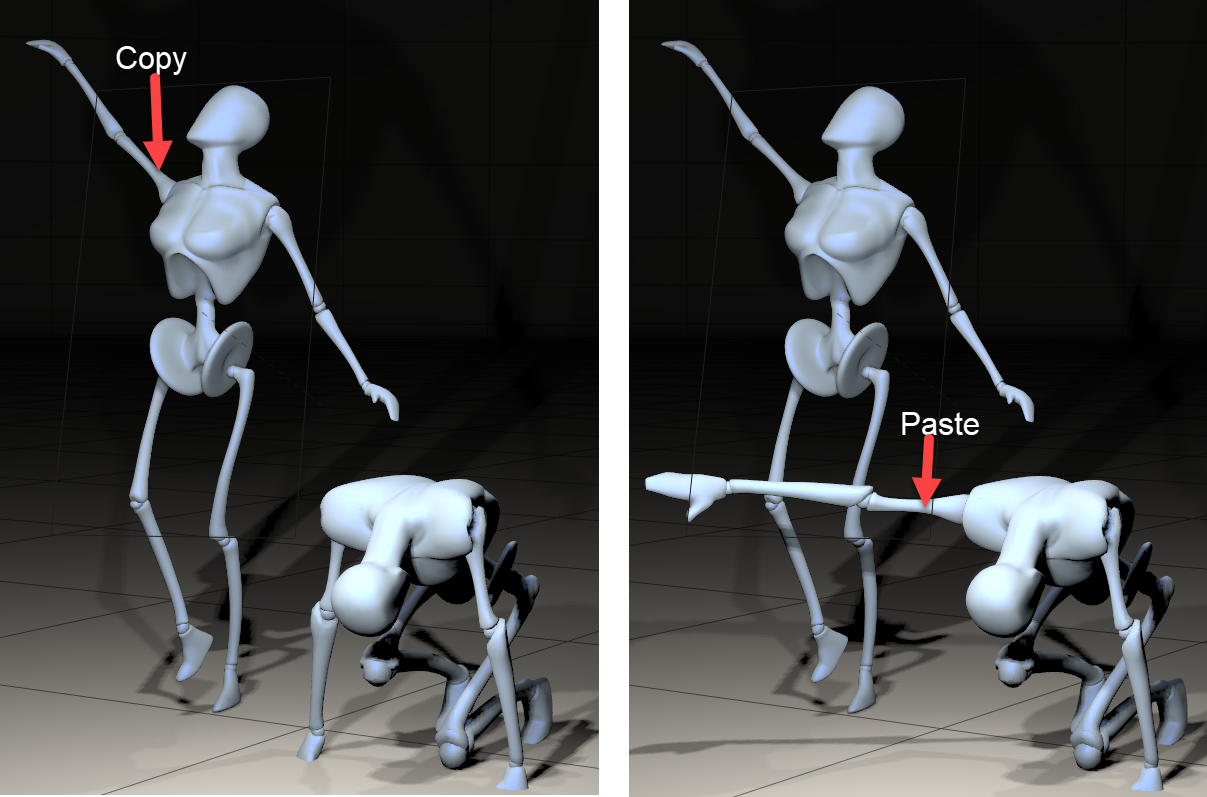
Before and after right shoulder pose settings are copied to another figure's right shoulder.
To copy and paste a body part:
- Manipulate the body part using any tool you desire.
- Select the body part (source), then select Edit > Copy or press [COMMAND]/[CTRL]+[C].
- Click to select the body part you wish to copy to (target) and select Edit > Paste or press [COMMAND]/[CTRL]+[V (see following subsection). This copies all settings from the source to the target, including deformers.
Paste
Selecting Edit > Paste, or pressing [COMMAND]/[CTRL]+[V], places the item stored in the Clipboard into your current scene. If you are pasting a pose, select the element to apply the copied pose to, then make your selection.
Copy Picture
Selecting Edit > Copy Picture takes a snapshot of your scene, which you can then paste into a graphics application such as Adobe Photoshop. Your scene is copied exactly as displayed in the Document.
Copying and pasting images in this manner is not the same as rendering.
Duplicate
The Duplicate [ObjectName] option creates an exact duplicate of the currently selected figure or prop. The duplicate object is placed within the Document, in the same position as the original. The duplicate object will appear in either the Select Figure or Current Actor menu, depending on whether it is a figure or a prop, and can be resized and repositioned independently from the original object.
After an object is duplicated, Poser will select the duplicated object as the current object.
Restore
Selecting Edit > Restore opens a submenu allowing you to restore scene elements, which are completely restored to their Poser default states, including but not limited to position, scale, morphs, parameters, materials, parent/child relationships, etc.
The Restore function is literally for cases when you wish to go back and start all over again. Use it with care!
The Restore submenu appears as follows:
- Element: Selecting Edit > Restore > Element restores the current element to its default state. An element could be a body part, prop, single camera, or single light.
- Figure: Selecting Edit > Restore > Figure restores the current figure to its default state.
- Lights: Selecting Edit > Restore > Lights restores all lights in your scene to their Poser default state.
- Camera: Selecting Edit > Restore > Camera restores the current camera to its default state.
- All: Selecting Edit > Restore > All restores all scene elements to their default states. Use this option with care!
Memorize
While working, you might arrive at a convenient stopping point. You know you like what you have so far and do not want to revert all the way back to the Poser default state should you need to restore one or more scene elements (or even the entire scene) at a later time. No problem. Select Edit > Memorize and the element(s) you wish to memorize (the list is the same as for the Restore submenu, above). Doing this essentially changes the default for your selected item(s), which can be undesirable in some cases. Redoing this operation saves the new default overwriting the old. If you later select Edit > Restore, your element(s) will be restored to the last memorized settings.
It is very important when setting up new figures to use the Edit > Memorize > Figure command to preserve default poses so that Inverse Kinematics works properly.
Memorization works on a per-file basis, meaning that memorizing defaults in one file does not affect the defaults of other Poser files or Library entries.