Assign View
Material Room: Assign view
Sections in the Assign View
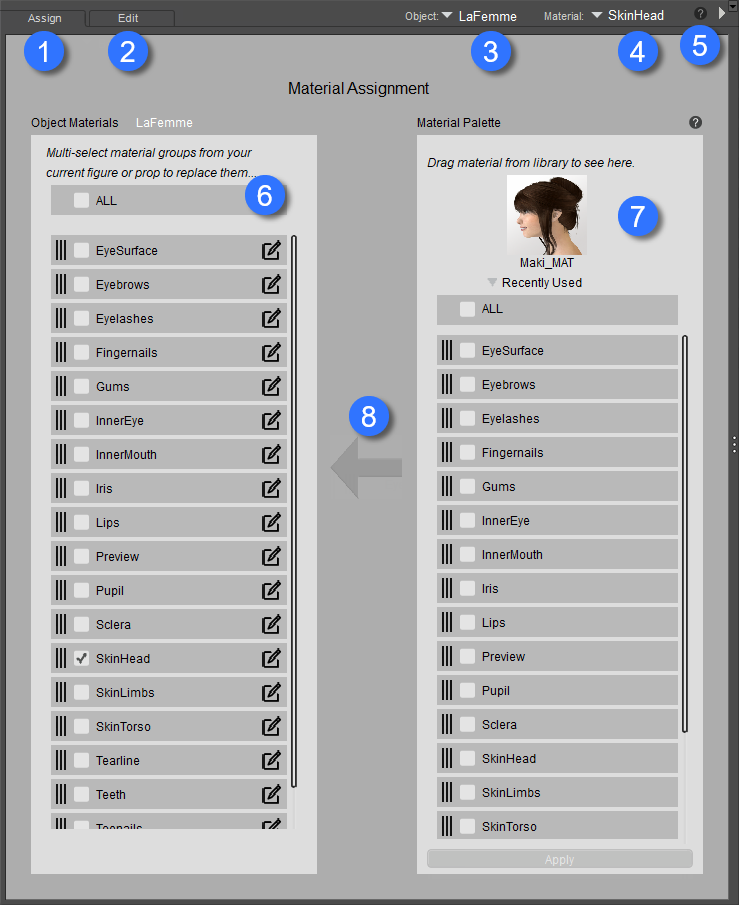
The Material Assignment window contains the following key areas:
- Assign Tab: Click this tab to view the Assign tab in the Material Room (as discussed in this topic)
- Edit Tab: Click this tab to display the Edit tab, where you can create advanced shaders and materials. The Edit View topic gives a brief overview of this tab and provides links to more advanced topics.
- Object Selector: Allows you to select any character or prop or other items in your scene. The materials included in the selected object will appear in the Object Materials tab (7). You can also select an object by clicking it with the Eyedropper editing tool.
- Material Selector: Allows you to choose a single material in the selected object. The materials included in the selected object will appear in the Object Materials tab (7). You can also select a material by clicking it with the Eyedropper editing tool.
- Help icon: Click the Question Mark icon to display room help for the Assign tab.
- Object Materials section: See Object Materials, below.
- Material Palette section: See Material Palette section, below.
- Apply Material button: Select at least one material from the Material Palette column, and one material zone from the Object Material column to assign materials to the scene.
Object Materials
The Object Materials section (#6 above) lists the material zones that exist in the currently selected object in your scene. The changes will be applied to any or all of the materials in the list.
- To change all of the materials in your selected object, choose ALL.
- To change some of the materials in your selected object, check the box beside the materials you want to change.
- You can also drag and drop materials from this list onto another object in the Scene window.
Material Palette
The Material Palette section (#7 above) allows you to preview a material before you apply it to an object in your scene. You can also drag and drop from this column to the Object Materials, or directly to any object in the scene.
- Use the Object Selector (#3 above) to choose the object that you want to assign materials to. The materials in the object display in the Object Materials section.
- Drag a material from the library and drop it onto the material preview chip at the top of the Material Palette.
- Check the material(s) in the Material Palette that you want to apply to the selected object.
- Select the material zone(s) in the Object Materials section that will receive the materials you selected in Step 2.
- Click the Apply button.
Several use case examples are shown below.
Assigning Materials
Assigning a Single Material (MT5)
MT5 materials are used to apply a single material to any material zone in a figure or objects. MT5 materials are often tileable, so that they can be applied to any object. This shows how to assign a single material to one material in an object.
- Use the Object Selector (#3 above) to choose the object that you want to assign materials to. The materials in the object display in the Object Materials section.
- Drag the new material you want to use from the library to the top of the Material Palette column.
- Check one material zone in the Material Palette column.
- Check one material zone in the Object Materials column.
- Then click Apply.
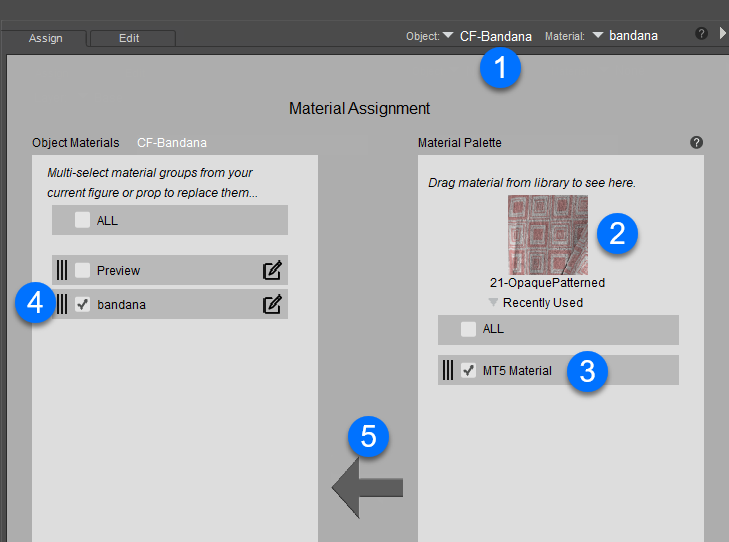
Assigning a Single Material.
Copying a MT5 Material to Multiple Zones
You can also apply MT5 materials to multiple material zones in a figure or object. This shows how to assign a single material to one material in an object. The steps are similar to the above, except that you select two or more materials to apply to in the Object Materials panel.
- Use the Object Selector (#3 above) to choose the object that you want to assign materials to. The materials in the object display in the Object Materials section.
- Drag the new material you want to use from the library to the top of the Material Palette column.
- Check one material zone in the Material Palette column.
- Check two or more material zones in the Object Materials column.
- Then click Apply.
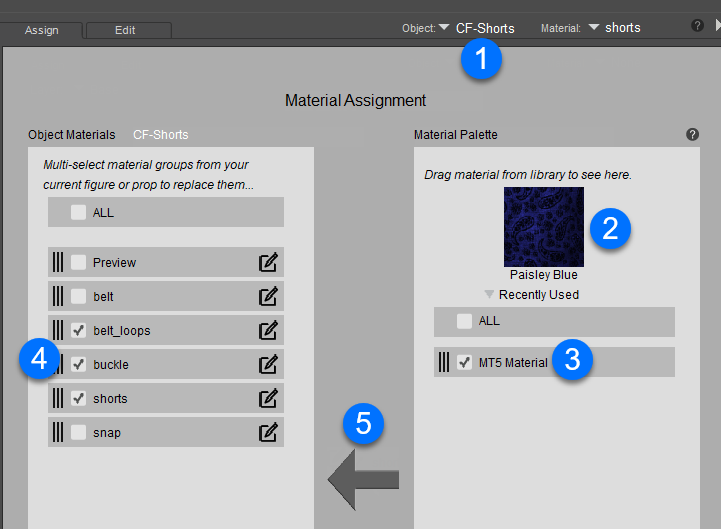
Assigning a Material to Multiple Zones.
Assigning a MC6 Material Collection
Material Collections (MC6) are used to combine several material zones found in a content item into one single material file. For example, a material collection can contain all of the different materials in a human character (head, torso, limbs, eyes, lashes, nails, and so on), or all material zones in a piece of clothing (blouse, sleeves, pockets, buttons, and so on). When assigning MC6 materials, you will need to use material collections that are made for that specific character (La Femme, Victoria 4), or that specific clothing or prop item).
To completely replace the material collection in the selected object:
- Use the Object Selector (#3 above) to choose the object that you want to assign materials to. The materials in the object display in the Object Materials section.
- Drag the material collection from the library to the top of the Material Palette column.
- In the Material Palette column check ALL.
- In the Object Materials column check ALL.
- Then click Apply.
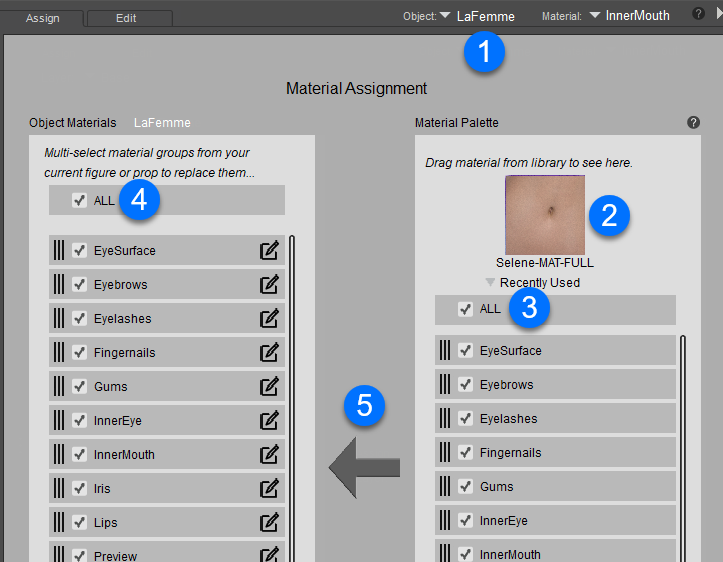
Assigning a Material Collection.
Applying Part of a MC6 Material Collection
Sometimes you want to keep some materials in your object, but replace others, This is easy enough to do in the Assign tab. For example, if you only want to change the skin and lips on a figure, but keep the eyes, inner mouth, and nails as they are, you would proceed as follows:
- Use the Object Selector (#3 above) to choose the object that you want to assign materials to. The materials in the object display in the Object Materials section.
- Drag the material collection from the library to the top of the Material Palette column.
- In the Material Palette column check only the materials you wish to apply (the skin materials and the lips).
- In the Object Material column check the material zones you wish to apply the material to (the skin materials and the lips).
- Click the Apply button. The materials will be applied only to zones with matching names.
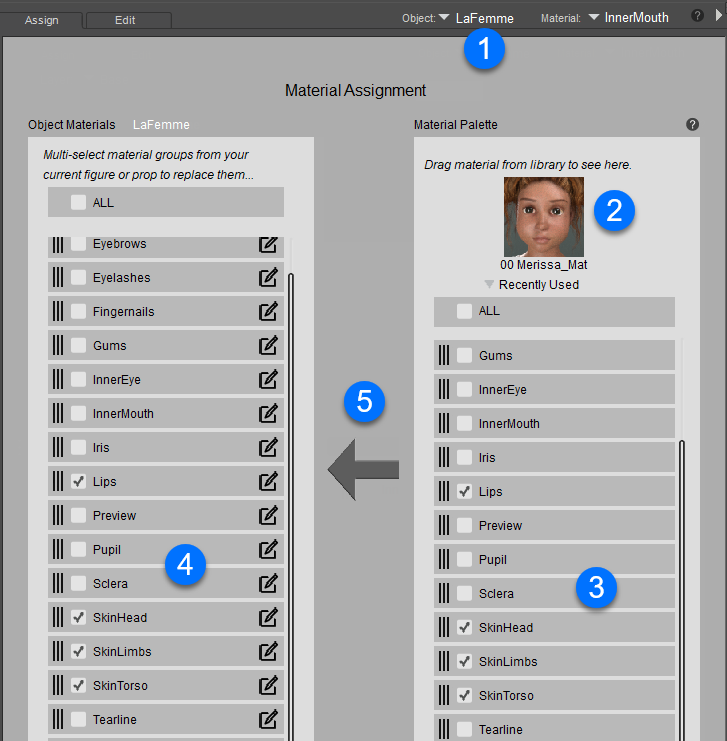
Assigning Part of a Material Collection.