Special Nodes
Contents
Custom Scatter (Custom_Scatter)
This node exposes subsurface scattering with the raw parameters available to the user, as opposed to the measured presets in the plain Scatter node.
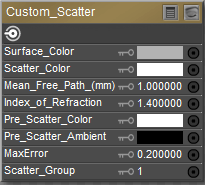
Custom Scatter node.
The Custom Scatter node has the following attributes:
- Surface Color: The overall color of the surface. Applied post-scattering, so textures applied to this input will remain sharp.
- Scatter Color: The color of the light that gets scattered in the material.
- Mean Free Path: The mean distance that light travels in the surface before it scatters. Larger values result in a more translucent effect. Note that regardless of the settings in the preferences, this parameter’s units are always in millimeters, due to the small size of typical values.
- IOR (Index of Refraction): The index of refraction of the material. Light hitting the surface will be reflected or transmitted dependent on the incident angle based on the index of refraction. Range is 0.0001 – 3.4.
- Pre-Scatter Color: The incoming light on the surface will be modulated by this color before it scatters in the material.
- Pre-Scatter Ambient: The amount of self-illumination of the material. This is being applied before scattering, so the illumination generated here will be scattered around in the material.
- Max Error: Same parameter as in the other two subsurface scattering nodes, this one is a speed vs. quality trade-off parameter. Lower values equal a more precise calculation at the expense of render time, higher values render faster but may show artifacts. Range is 0.0 – 1.0.
- Scatter Group: Materials with the same scatter group will appear as one surface to scattering. Materials in separate scatter groups are considered separated. See sample render under Scatter .
FastScatter
The FastScatter node offers an easy application of subsurface scattering (SSS) effects. The results of the FastScatter calculation approximate true Subsurface Scattering.
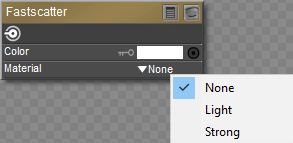
Fast Scatter node.
Subsurface scattering simulates the interaction of light with translucent materials, whereby the light interacts to some degree with the material below the surface level. The FastScatter node is a legacy node that was introduced prior to the implementation of true Subsurface Scattering. This node should be phased out by content developers and replaced with one of the true Subsurface Scattering nodes: Subsurface Skin or Scatter.
Hair
The Hair node allows you to color your characters’ or props’ strand-based hair. Hair generated in Poser’s Hair room uses this node. It has the following attributes:
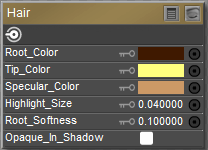
Hair node.
- Root Color: The Root_Color attribute selects the color for the root of the hair. Clicking this attribute opens a standard Color Picker.
- Tip Color: The Tip_Color attribute selects the color for the tip of the hair. Clicking this attribute opens a standard Color Picker.
- Specular Color:: The Specular_Color attribute selects the hair’s highlight color. Clicking this attribute opens a standard Color Picker.
- Highlight Size: Allows you to determine the size and intensity of the highlights in the hair.
- Root Softness: The Root_Softness attribute controls the root’s transparency, which helps hair blend into the scalp.
To create realistic hair shaders, connect this node to the root node’s Alternate Diffuse attribute.
- Opaque in Shadow: Check this option to create solid shadows beneath hair strands. This allows you to create hair that looks more full without having to increase the number of hairs on the head (thereby requiring less computer resources).
Opaque in Shadow is not supported in SuperFly.
Scatter
The Scatter node offers another way to render scattering effects in various objects, including skin. A number of presets that use real-world material properties are included in this node.
The Scatter node offers the following settings:
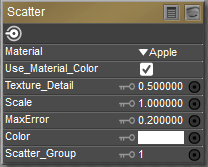
Scatter node.
- Material: The Material selector includes several presets that emulate the scatter effects of real-world materials.
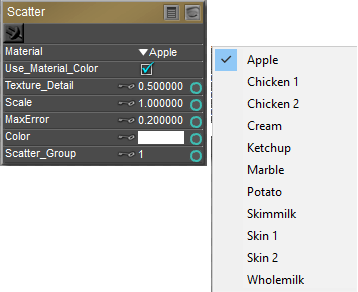
Material options.
- Use Material Color: Check this option if you want to use color from the Material property.
- Texture Detail: Represents the ratio of the use of the texture for post-scatter versus pre-scatter. The range is from 0-1.0. A value of 1 will apply 100% of texture at post-scatter, yielding more texture details. A value 0 uses none of texture at post-scatter, applying all of that texture for pre-scatter calculations, and yields very low texture detail. A value of .5 is a reasonable point to start experimenting.
- Scale: Each of the Scatter materials are based on physical measurements. The Scale setting decreases or increases the physical scale to adjust appropriately for your geometry in the event that it is smaller or larger than it would be in real life.
- MaxError: This setting is a quality-speed trade-off. When set to a low value, you will get higher precision in the subsurface scattering, but rendering will be more slow. When set to a higher value, you will get better rendering speeds, but less precision in the subsurface scattering.
- Color: Determines the base color for the material. The Scatter effect is added to this color. By default it is set to white. You can choose another color or add an image map or other node to the input.
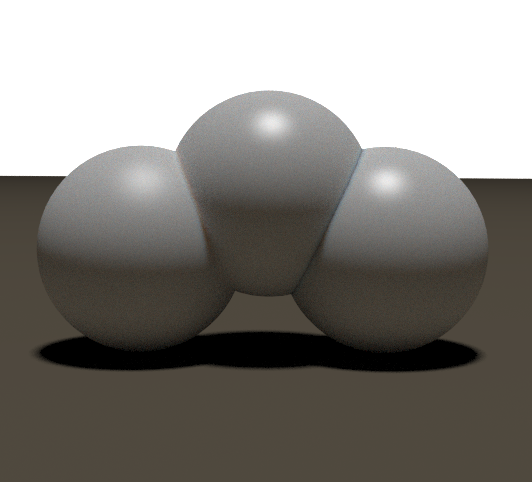
- Scatter Group: Materials with the same scatter group will appear as one surface to scattering. Materials in separate scatter groups are considered separated. In the image that follows, the two spheres on the left are in the same scatter group. The sphere on the right is a different scatter group.
Scatter Groups
It is beneficial to place teeth or eyeballs in a different scatter group than the skin on the face. This prevents light from scattering between them.
Use the same scene that you started with in Subsurface Skin. If you completed that exercise, disconnect the Subsurface Skin node from the Alternate Diffuse input of the PoserSurface node, and then right-click the Subsurface Skin node and choose Delete Node.
Next, right-click in an empty area in the Edit material view. Choose New Node > Lighting > Special > Scatter. A new scatter node is added to the Edit material view. Plug the output into the Alternate Diffuse input of the PoserSurface node. Set the Diffuse Value in the PoserSurface node to 0 to turn the texture influence off.
You will notice when you render the Scatter node that the object takes on the color of the selected material. The color of the real-world materials is built in to the preset. In other words, if you choose the Apple material there will be a green tone to the Scatter effect. If you choose Skin1 or Skin2, the object will have natural skin tones, and so on. Examples of Apple and Skin 1 are shown in the following figure.
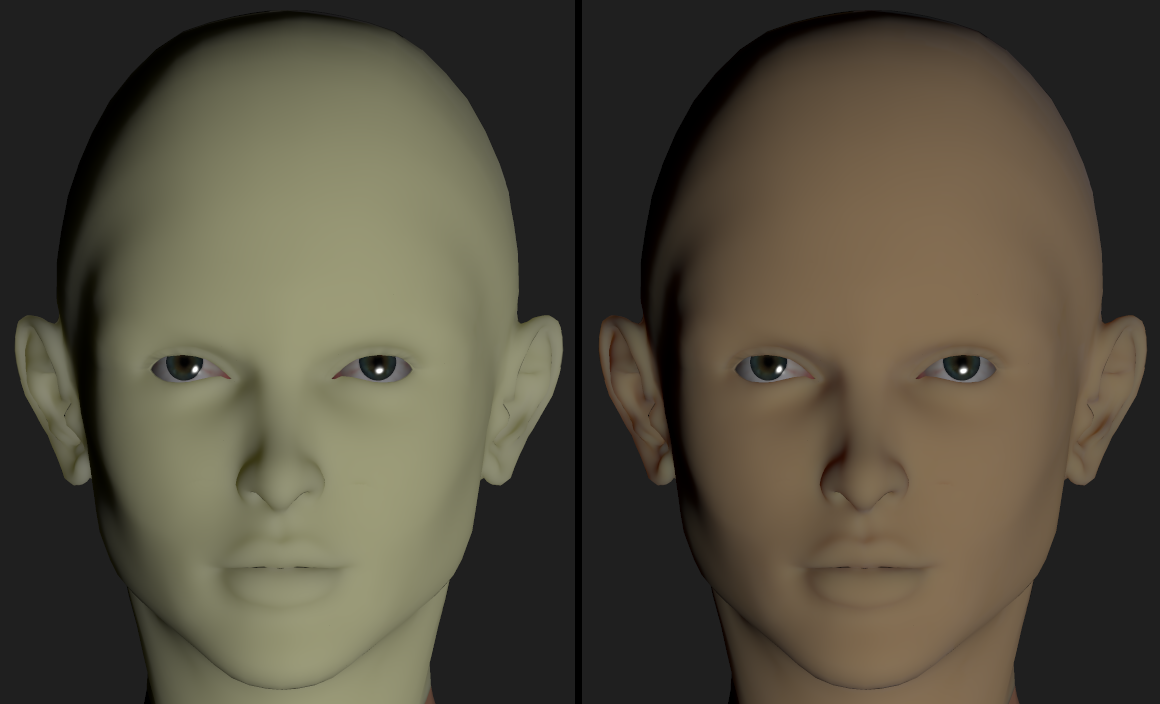
Apple preset (left); Skin 1 preset (right).
Because colors are built into the Scatter presets, you will need to take that into account when you use skin textures that have built-in color (as most do.) There is a way that you can work around this.
First, right-click in an empty area of the Edit material view and add a Color Math node (New Node > Math > Color_Math).
Click the Value 2 color chip in the Color Math node, and then use the eyedropper to select the base skin color from the Image Map texture preview. This is the color that will be removed after passing through the Color Math node.
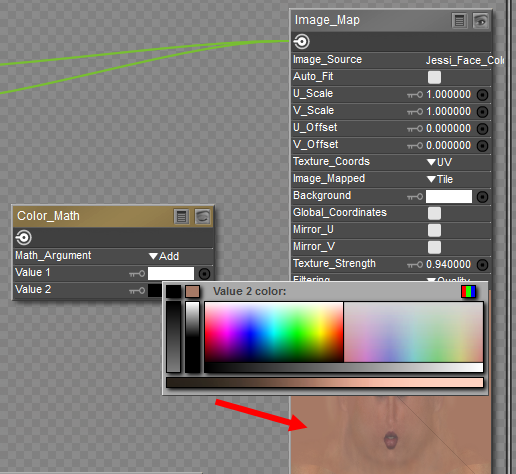
Select the base color for Value 2 from the image texture map.
Set the Math Argument of the Color Math node to Divide.
Connect the output from the Image Map node into the Value1 connector of the Color Math node. You can display the texture preview in the Color Math node to view the result. You should see a preview with the base flesh color removed, and leaving other areas such as brows, eye makeup, and shadows to pass through to the Scatter node.
Connect the output of the Color Math node into the Color input of the Scatter node.
Connect the output of the Scatter node into the Alternate Diffuse input of the PoserSurface node. When completed, it should look like the following figure:
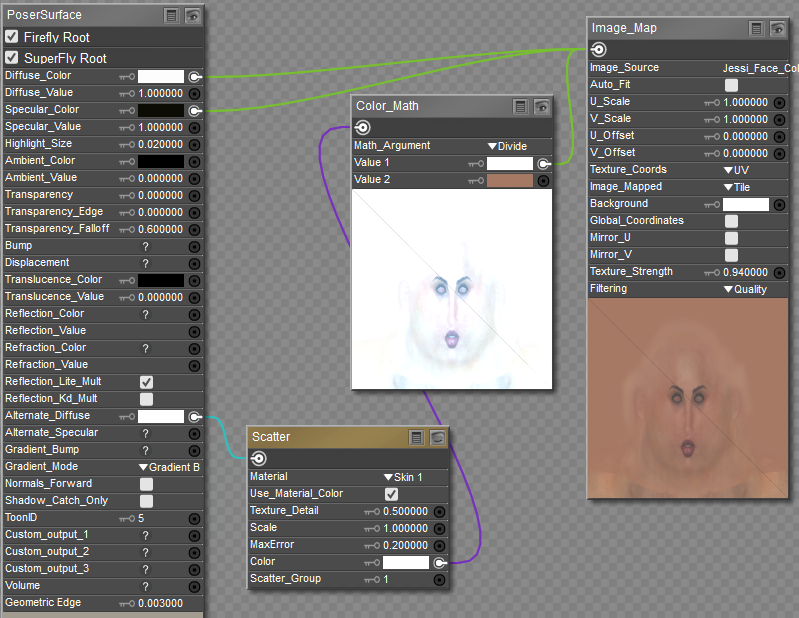
Final Color Math connections.
Now when you render your head, you will see the scattering effects and skin tone from the Scatter node combined with the additional detail that was in the texture you used.
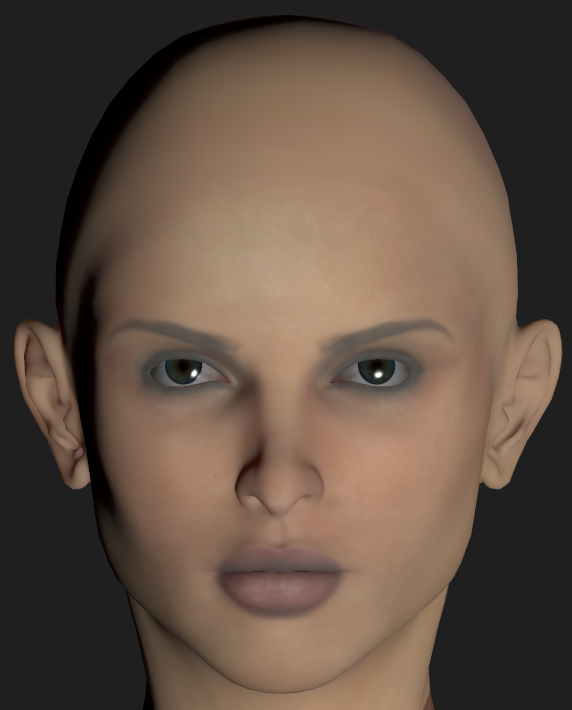
Skin 1 Preset with added color from the Image Map and Color Math nodes.
Skin
The Skin node allows you to create realistic skin. It has the following attributes:
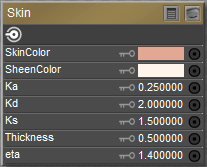
Skin node.
- Skin Color: The SkinColor attribute selects the skin’s base color. Clicking this attribute opens a standard Color Picker.
- Sheen Color: The SheenColor attribute is the color of any highlight that appears on the object surface. Highlights lend the illusion of shininess. For example, a piece of wood displays no highlight, while a piece of polished metal has one or more distinct highlights. This color is generally the same as that of the direct lighting falling on the affected surface but does not have to be.
- Ka: The Ka attribute controls the ambient light strength, where 1=100%.
- Kd: The Kd attribute controls the diffuse light strength, where 1=100%.
- Ks: The Ks attribute controls the specular light strength, where 1=100%.
- Thickness: The Thickness attribute controls the thickness of the top, translucent skin layer.
- ETA: The ETA attribute controls the density of the top, translucent skin layer.
Subsurface Skin
The Subsurface Skin node offers more realistic skin effects than the Skin node. It adds subsurface scattering effects that give the skin more luminescence and sheen. This node has the following settings:
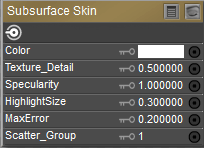
Subsurface Skin node.
- Color: Determines the base color for the material. The Subsurface Skin effect is added to this color. By default it is set to white. You can choose another color, or attach an image map or another node to the input.
- Texture Detail: Represents the ratio of the use of the texture for post-scatter versus pre-scatter. The range is from 0-1.0. A value of 1 will apply 100% of texture at post-scatter, yielding more texture details. A value 0 uses none of texture at post-scatter, applying all of that texture for pre-scatter calculations, and yields very low texture detail. A value of .5 is a reasonable point to start experimenting.
- Specularity: When set to 1, this setting approximates the physical specular behavior of human skin. Increase or decrease the setting for your desired effect.
- Highlight Size: Determines the size of the highlight, similar to the way that Highlight Size works in the Root node.
- MaxError: This setting is a quality-speed trade-off. When set to a low value, you will get higher precision in the subsurface scattering, but rendering will be more slow. When set to a higher value, you will get better rendering speeds, but less precision in the subsurface scattering.
- Scatter Group: Materials with the same scatter group will appear as one surface to scattering. Materials in separate scatter groups are considered separated. See sample render under Scatter.
To demonstrate the Subsurface Skin node we start with a simple scene: a figure and two directional lights with raytraced shadows. The head texture is very simple, just an image map plugged into the diffuse color and the specular color. Diffuse color is set to white, and specular color is set to black with a value of zero.
Firefly render settings for the scene are also standard. However, in order to use the Subsurface Skin node, the Subsurface Scattering option must be turned on in Firefly’s Render Settings tab.
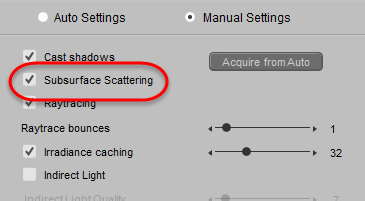
Firefly Render Settings dialog with Subsurface Scattering turned on.
Go to the Material room and select the Head material. Right-click in an empty area in the Edit material view and choose New Node > Lighting > Special > Subsurface Skin.
Plug the output of the image map into the Color input of the new node. Then, plug the output of the new node into the Alternate Diffuse input of the PoserSurface root node. Finally, set the Diffuse Value setting in the root node to 0, so that Poser only uses the ALT Diffuse setting.
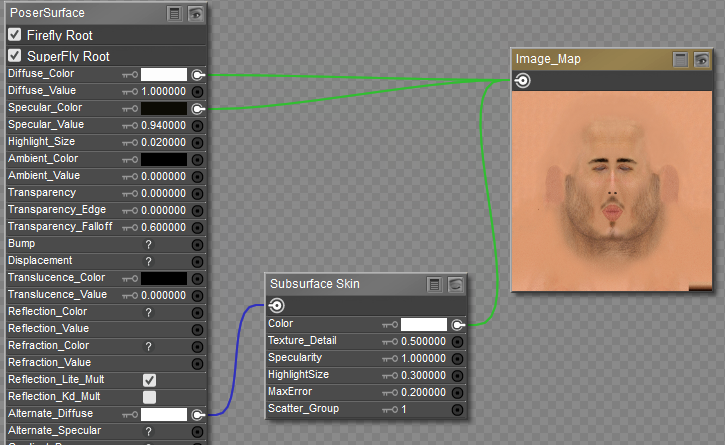
Material Settings for the Subsurface Skin node.
When you render the new material, Poser will first render a pre-pass to calculate light all over the surface (including the back side). During the second pass, it calculates the scattering.
The following figure shows a comparison before and after subsurface scattering is added on a character.
Subsurface scattering only works on objects that are in direct view of the camera. Objects in reflected surfaces will not be calculated with proper Subsurface Scattering.
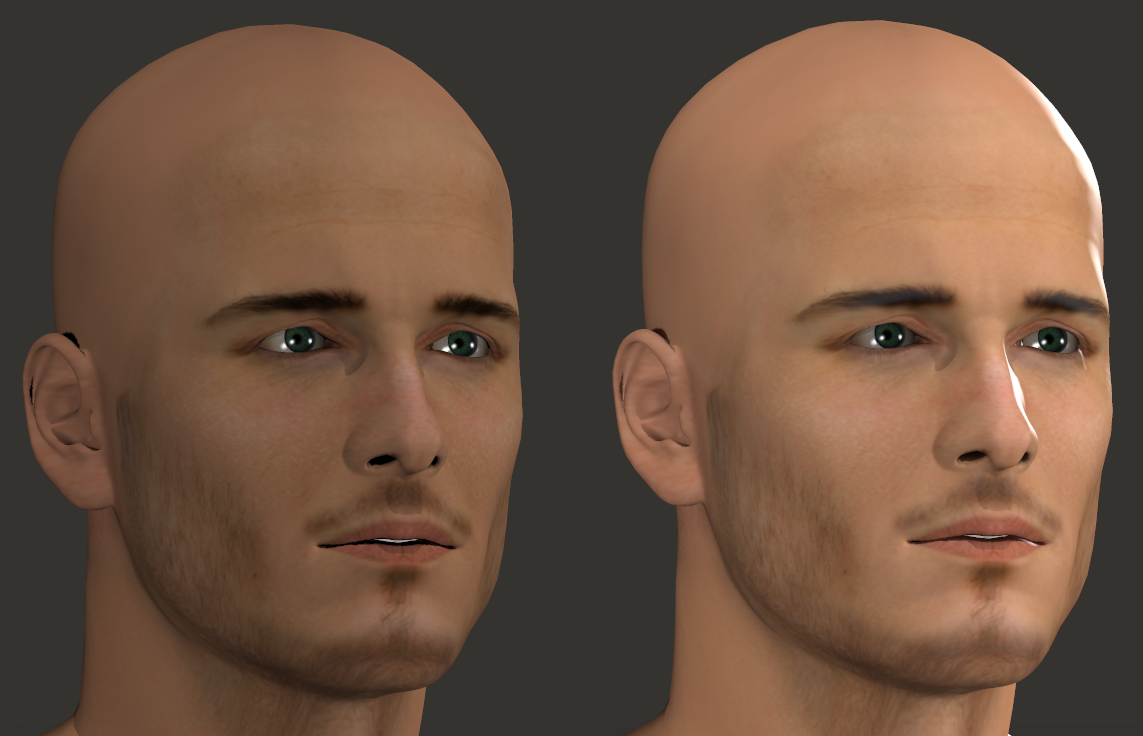
A figure without subsurface skin (left); with subsurface skin (right).
Velvet
The Velvet node allows you to create the appearance of realistic velvety fabric. It has the following attributes:
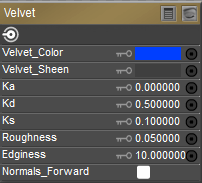
Velvet node.
- Velvet Color: The Velvet_Color attribute selects the color. Clicking this attribute opens a standard Color Picker.
- Velvet Sheen: The Velvet_Sheen attribute is the color of any highlight that appears on the object surface. Highlights lend the illusion of shininess. For example, a piece of wood displays no highlight, while a piece of polished metal has one or more distinct highlights. This color is generally the same as that of the direct lighting falling on the affected surface but does not have to be.
- Ka: The Ka attribute controls the ambient light strength, where 1=100%.
- Kd: The Kd attribute controls the diffuse light strength, where 1=100%.
- Ks: The Ks attribute controls the specular light strength, where 1=100%.
- Roughness: The Roughness attribute controls the thickness of the velvet.
- Edginess: This attribute controls the horizon scatter of the velvet.
- Normals_Forward: Checking the Normals_Forward checkbox will flip the surface normal to point towards the camera (or towards the ray in case of raytracing). Use this option to avoid shading artifacts on double-sided polygons.
Volume
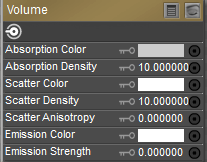
Volume node.
- Absorption Color: The color of the light that is absorbed by the volume material.
- Absorption Density: How much of the light interacts with absorption.
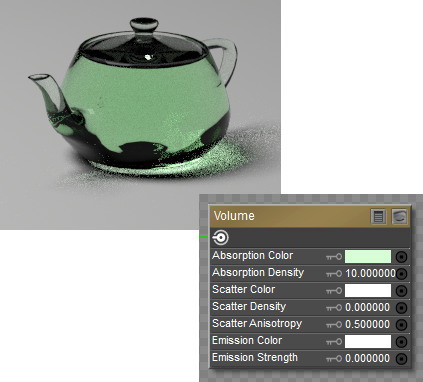
Absorption Color example.
- Scatter Color: The color of the light that is scattered from the volume material.
- Scatter Density: How much of the light interacts with volume scattering.
- Scatter Anisotropy: The direction in which the light is most likely to scatter.
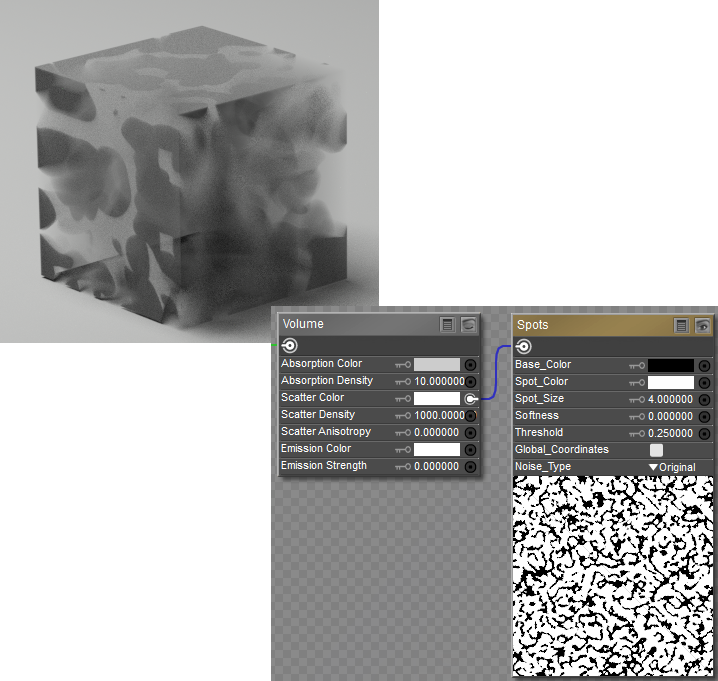
Scatter Color example.
- Emission Color: The color of light that is emitted from the volume.
- Emission Strength: The strength of the emission color.
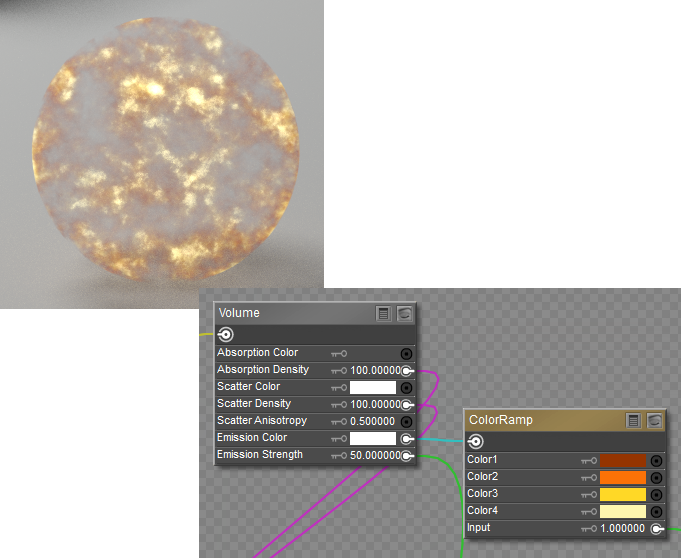
Emission Color example.