Exporting COLLADA Files
COLLADA offers increased flexibility by allowing to export a more comprehensive representation of your Poser scene. For example, as a game designer, you might want to import your scene exported from Poser as COLLADA file into 3ds Max or Softimage. You can work on your scene in those applications, and then transfer it to your game engine with COLLADA. Your scene remains editable at any position in the pipeline. COLLADA is a feature-rich format that can store various aspects of your scene, thereby preserving a maximum of information upon export. Provided that the application you are exporting for supports those features, you can choose to transfer data such as static figures, props, baked morph targets, cameras, and lights.
Poser currently supports export of COLLADA 1.4. COLLADA 1.5 is not yet supported.
To Export a COLLADA file:
- From the Main Menu select File > Export > COLLADA|RWY.
- The Export Range dialog appears. If you want to export only the current frame, choose Single Frame. To export multiple frames in an animation, choose Multi frame export, and then enter the range of frames to be exported.
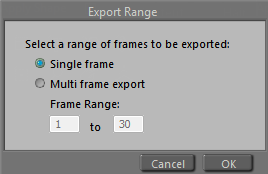
Export Range dialog.
- The Select Objects dialog appears. By default, the lights, main camera, and all figures and props in your scene are selected for export. You can uncheck objects you don’t want to include, and check other objects that you do want to include. After you make your selections, click OK to continue.
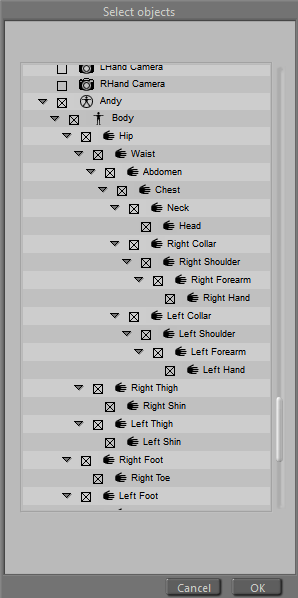
Choose the objects to export from your scene.
If subdivision is set on any of the objects in your scene, Poser will warn you that subdivision will be turned off for the COLLADA export. Click Cancel to return to Poser, or OK to continue.
- Click OK to continue. The Export Options dialog appears. Enable the appropriate Export Options and click OK. These options include:
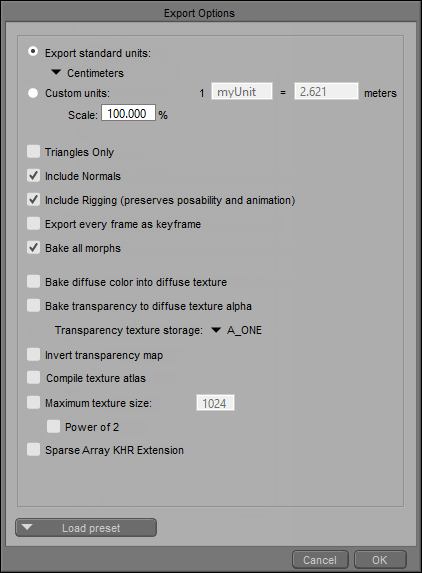
Export Options dialog.
- Export Standard Units vs. Custom Units: Select one of the standard Poser units. If none of the standard units meet your needs, then you can define your own Custom Units in meters.
- Scale: This allows the adjustment of the scale of a scene upon export. Adjust the scale if you want to adjust the size of the scene.
- Triangles only: Forces triangulation of polygons upon export.
- Include normals: Allows you to specify whether polygon normals are exported explicitly. Discarding the normals will require the target application to recompute them. Toggling this option may help resolve shading issues.
- Include rigging (preserves posability and animation): Figures are exported as poseable and animatable objects.
- Export every frame as keyframe: When checked, will export an animation keyframe for every frame in the selected range. When unchecked, exports already existing keyframes only. This can help increase accuracy in a complex setup (e.g. conforming clothing) or if the importing application has difficulties interpolating between keyframes.
- Bake all Morphs: COLLADA files with a lot of morphs can be large and resource consuming. Bake Morphs allows the export of morph targets so you get the essence of the morphs without the file size and resource expense. You will not be able to animate those morph targets any more, which sacrifices some flexibility. However, you’ll receive the same end result if you are only interested in the particular shape variation that was present in your scene upon export.
- Bake Diffuse Color into Diffuse Texture: Blend diffuse texture with diffuse color. If you enable this option Poser will write a new texture map that is shader baked into a texture map.
- Bake transparency to diffuse texture alpha: When checked, Poser will not generate a transparency map. Instead, transparencies will be applied in the alpha channel of the diffuse texture. When unchecked, Poser will include a transparency map with the exported COLLADA file.
- Transparency texture storage: Check this option to bake transparency maps to a channel. By default, transparencies are baked to the RGB_ZERO channel. You can alternatively bake to the A_ONE channel by selecting that option from the channel selection menu.
- Invert Transparency Map: Choose this option to output a “negative” transparency map. For example, in Poser black areas indicate transparent areas and white areas indicate opaque areas in the transparency map. An inverted transparency map would be the opposite (black is opaque and white is transparent).
- Compile texture atlas: When checked, the Texture Atlas Options dialog (described in Texture Atlas Options) will appear so that you can choose which texture maps are combined and saved with your file. When unchecked, Poser will export all texture maps that are included in the object(s) you are exporting in their original size.
- Maximum Texture Size: Textures in Poser content are often very large. Some applications experience difficulties upon importing COLLADA files with large textures. Maximum Texture Size allows you to automatically reduce texture size upon export, thereby maximizing compatibility. Your original textures remain untouched.
- Power of 2: You can increase compatibility further by enabling the Power of 2 option. This option will automatically resize your textures to the nearest width and height that is a power of two. For example, a texture that is 1100x600 pixels large would be exported at a size of 1024x512. Once again the original texture remains unaffected.
When exporting from Poser to 3D software that supports COLLADA, you can export using Poser’s default skinning method, or a single mesh with weight maps. For more information on these options, see Skinning Methods.
- Sparse Array KHR Extension: Check this option to enable the writing of morph targets in a more compact representation. This results in smaller files, but morph targets will only be readable by software that supports this extension.
- Load Preset: Click the Load Preset button to choose from one of several pre-defined preset configurations.
- Click OK to choose a folder and enter a filename for your export. Then click Save to save the file.