Creating Morphs in Other Applications
Contents
Creating Custom Morph Targets
You can create morph targets using your favorite 3D modeling application so long as that application can import and export Wavefront OBJ (*.OBJ) files. To do this:
- Export the body part for which you wish to create the morph target as explained in Exporting Files.
- Import the body part into your favorite 3D modeling application.
- Edit the geometry, being careful to only move vertices. Do not add or remove vertices, or your morph target will not work.
- Export the edited geometry from the 3D modeling application in the Wavefront OBJ (*.OBJ) format.
- Load the morph target.
Adding Custom Morph Targets
Selecting Object > Load Morph Target allows you to load a morph target for your currently selected element.
Poser currently does not support import of subdivided meshes. Morphs imported from modeling software must be created at base resolution.
You can add morph targets that you created using a third-party application and apply them to your figures and props. You can also add third-party morphs obtained from online sources.
To add a custom morph target:
- Select the body part/prop to which you want to apply the morph and open its properties in the Properties palette.
- Click Load Morph Target to open the Load Morph Target dialog.
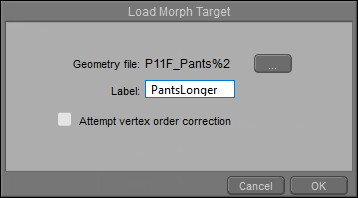
Loading a Morph Target.
- Enter the complete path and filename to your desired morph or use the Locate button to open a standard Browse dialog allowing you to locate the correct file. Your selected file must be in OBJ format, contain the same number of vertices as the original body part/prop, and must only contain the body part/prop being morphed.
- Enter a name for the added file, then click OK to exit back to the Parameters palette. A new parameter dial appears with the name of the newly added morph.
In order for morph targets to work properly, they must have the same vertex order as the geometry mesh to which they are applied. Some applications have difficulty preserving the vertex order when editing or writing out morph targets. If you find that your imported morph targets behave unexpectedly, you may wish to check the Attempt Vertex Order Correction checkbox when loading them. This checkbox is located on the Load Morph Target dialog, which can be accessed by selecting Object > Load Morph Target, or clicking the Load Morph Target button on the Properties palette. Please note that significant changes to vertex order are not possible with automatic correction.