Creating Master Parameters
You can create a new Master Parameter dial from the Parameters option menu in the Parameters Palette. Master and Dependent Parameters aren’t restricted for use in figures.
In this first example, we demonstrate how you can create a Brightness master parameter on the main light in your scene, and use it to raise or lower the brightness in all of the lights in your scene at the same time.
Using Poser’s default three-light setup as an example, you would create a master parameter for Light 2 (the front off-white light) as the Master Parameter, as follows:
- Create a new scene that contains three lights. Label them Light 1, Light 2, and Light 3. Alternatively, you can start with the default scene and delete all but Light 1, 2, and 3.
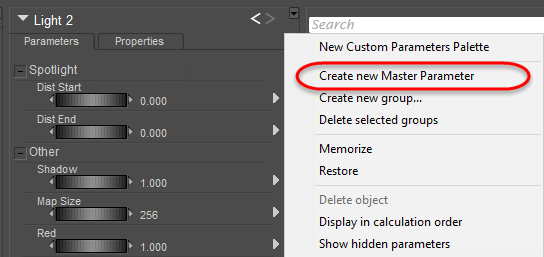
- Select the actor that will serve as the master parameter. In this case, we want to add a new Master Parameter to Poser’s default Light 2.
- With Light 2 selected, click the Parameters Palette Options menu, and choose Create New Master Parameter. When prompted for a name, enter Master Light.
Creating a new Master Parameter dial.
- Switch to the Keyed Dependencies tab if necessary. You need to add two keys for each dependent parameter that you want to add. Since Light 2 (the Master Light) is selected, we will adjust the brightness on that light first. First, click the Start Teaching button.
- In the Dependent Parameters palette, set the Parameter dial to 1.000. This is the value we will use as the “Bright” setting for the Master 1 Parameter dial.
- Now you adjust the brightness on all three lights in your scene. It doesn’t matter which order you complete them in, but since we have Light 2 selected already we’ll do that one first. If settings remain the same as they were, they are not added to the Dependent Parameters list. But when you enter a value the change will be recorded as shown in the following figure:
- Set the Intensity for Light 2 to a high value, such as 800%.
- Select Light 1 from the Actor selector in the Parameters palette. Set its Intensity value to 10%
- Select Light 3 from the Actor selector in the Parameters palette. Set its Intensity value to 800%.
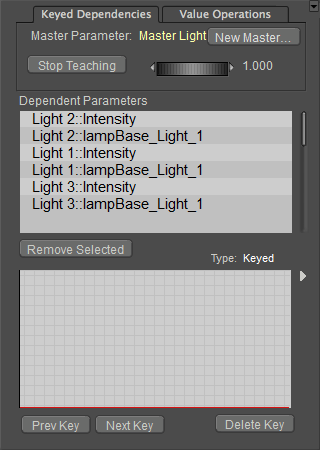
After the first key is created, click the Next Key button.
- Click the Next Key button in the Dependent Parameters palette to create a key for the other end of the Master 1 parameter dial.
- In the Dependent Parameters palette, set the Master 1 parameter to -1.00 (negative value). This is the setting that we will use to turn the lights off.
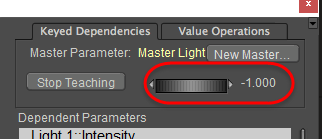
Set the Master Parameter dial to -1 to create the low setting for the master dial.
- Use the Parameters palette to set the intensity of your current light to 0% (off). Then do the same for the other two lights. At a Master Parameter setting of -1, the lights in your scene will be completely off.
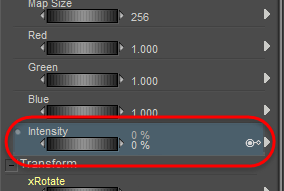
Set the intensities for the lights to 0%.
- With all of your settings configured, click the Stop Teaching button in the Parameters Palette. You can also close the Dependent Parameters palette, if desired.
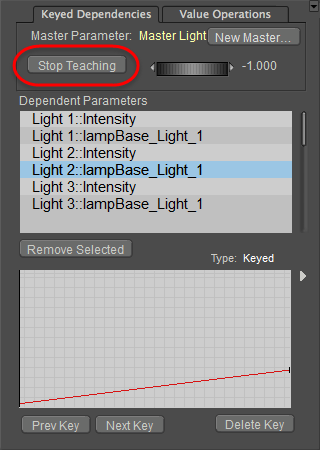
Click the Stop Teaching button when you complete the actions you want to perform.
Because you created the Master Light dial when you had Light 2 selected, you should now see a Master Light dial in its Parameters palette. Select Light 2, and then look for a dial named Master Light. Adjust the Master Light parameter dial up and down toward or beyond -1 and 1. You will notice that when the dial is set to -1 or lower all lights will be off; and when set to -1 or higher the lights will be set to the maximum values.
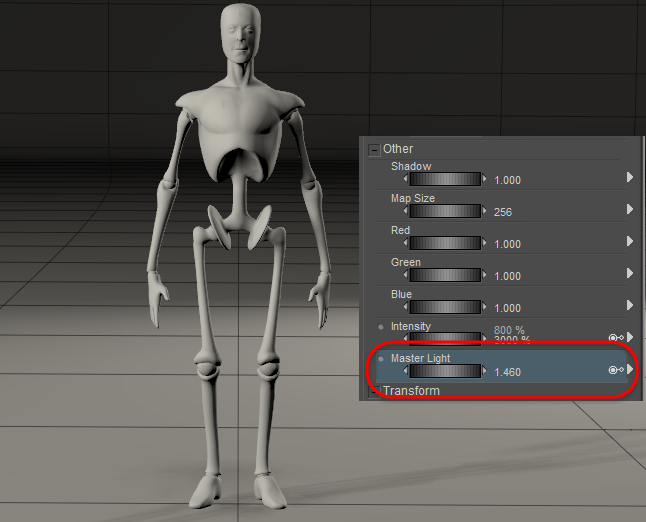
Test the new parameter dial to make sure it works as you expect.