Editing Master Parameters
The Dependent Parameters feature can be used to create or enhance Full Body Morphs. In this section, we’ll describe how you can use the dependent parameters feature to enhance the Pregnant full body morph.
Create a new Poser scene and add Alyson 2 to your scene (she has a good range of morphs to play with). Select her Body, and expand the FBM morph section. Scroll down, if necessary, until you see the Pregnant morph. Click the Master Parameter icon to open the Dependent Parameter editor.
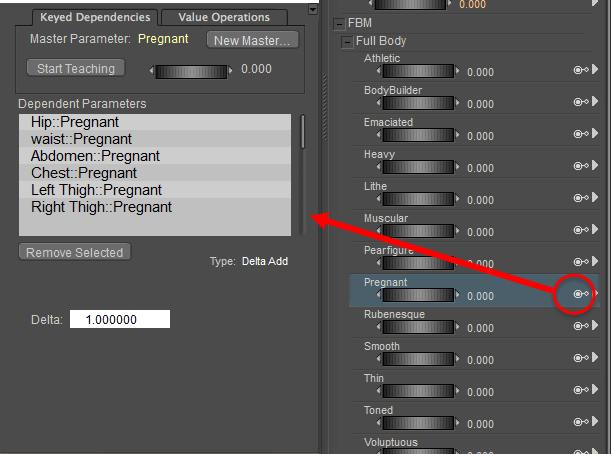
A master parameter icon.
For several Poser figures, you’ll notice that a number of dependent parameters already appear in the Dependent Parameters editor. If you highlight one of the Dependent Parameters, the selected parameter appears in the Parameters palette.
When you select one of the body parts that are affected by a Master Parameter, you’ll see two values. For example, when you select the Left Thigh: Pregnant entry in the Dependent Parameters list, the settings for the rButtock body part appear in the Parameters palette.
As mentioned earlier in Using Dependent Parameters, there are two numerical values listed to the right of each morph dial:
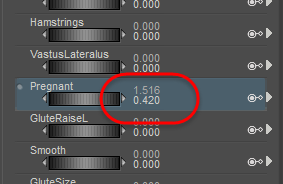
Morphs affected by dependent parameters have two values: natural and driven.
- The driven value (upper) designates the value as controlled by the master parameter. In this case, we are looking at a Master Parameter dial (Pregnant), so its Driven value in the Parameters palette is the same as that set in the Dependent Parameters window.
Poser 12 allows you to set the driven value of the master parameter dial from any affected body part. For example, when you dial the Pregnant morph from Alyson 2’s left thigh, you will see the morph dial in to all other affected body parts (abdomen, hip, and so on) as if you were dialing in the full body morph.
- The natural value (lower) designates the value that is currently set for the morph dial in the Parameters palette.
Because the master and keyed dependencies are sync’d together by default in Poser 12, you will need to disable the Master Sync’d option for any parameter dial that you need to dial in to a different value. To do this, click the arrow to expand the parameter dial options, and uncheck the Master Synched option. You will then be able to adjust the natural value of the parameter. As you increase the natural value, the driven value will be increased by a proportional amount.

Uncheck the Master Sync’d option for any driven parameter that you want to control independently of the master parameter dial.
The Dependent Parameters list displays a list of the morphs that are adjusted by the Pregnant morph. The figure shown on the previous page shows that the Pregnant morph dial in Alyson 2’s Body actor controls the Pregnant morph in the hip, waist, abdomen, chest, left thigh, and right thigh. If you are already familiar with previous versions of Poser, you might recognize this type of morph relationship as a “Full Body Morph.” In earlier versions of Poser, you would have used the Figure > Create Full Body Morph command to create a master parameter dial in the figure’s Body part.
While the older method of creating Full Body Morphs is still available, the Dependent Parameters feature provides you with even more power. For example, you can link additional partial body morphs or full body morphs to the Pregnant dial so that there are even more changes to the shape of Alyson’s pregnant body. To demonstrate, we are going to make the Pregnant morph even more natural looking, by adding additional changes to the breasts and hips. The Dependent Parameters feature makes this a very simple process.
Since Alyson 2 is already in your scene, select Body as the current body part. Scroll down until you see the Pregnant full body morph, and dial in or enter a setting of 1 in the Dependent Parameters window.
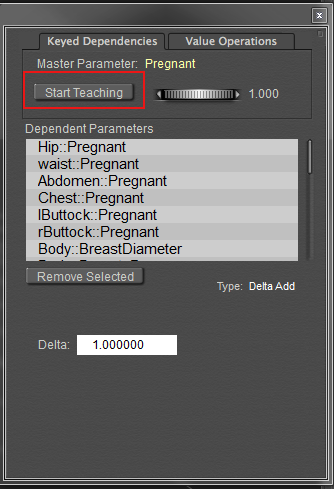
The Pregnant morph is set on several body parts. Click Start Teaching to further enhance the shape.
In the Dependent Parameters window, click the Start Teaching button. This instructs Poser to create a link between the Master Parameter and the values that you select until you tell Poser to stop teaching the joint parameters.
Now, we’ll adjust some of the breast settings to make them look more like those of a pregnant woman. With Alyson 2’s Body actor selected in the Parameters window, scroll down in the Parameters palette and expand the morphs under the Breasts category. Then you can use the dials or enter values numerically. The following list shows the values that we set. Yours don’t have to be exactly the same, feel free to experiment with other settings if you desire:
- Areola Size: .548
- Breast Diameter: 1.072
- Breast Droop: 1
- Breasts Large: 1.216
- Breasts Natural: 1
- Nipples: .248
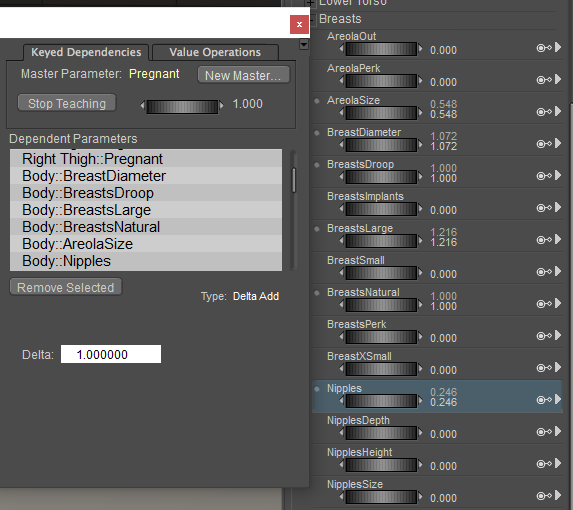
Breast morphs are adjusted for a fuller appearance.
Notice now that the shape of the breasts looks more natural and realistic. Now we’ll add a couple of other Full Body Morphs to the mix. We’ll add a touch of the Pear Figure and Rubenesque to adjust the overall body shape just a bit. Scroll back up to the Full Body morphs section in the Parameters Palette, and adjust the following values:
- PearFigure: .199
- Rubenesque: .199
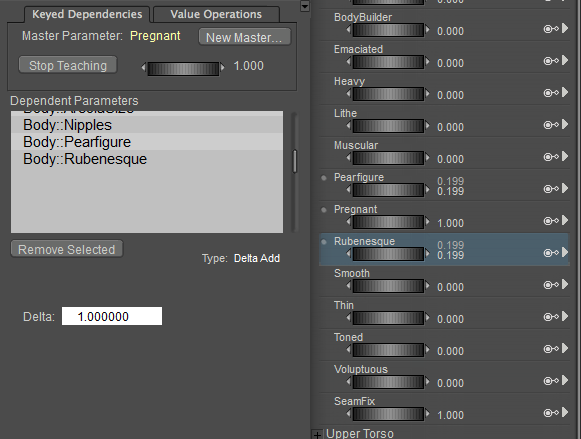
Other Full Body Morphs add additional shape to the Pregnant morph.
Now return to the Dependent Parameters window, and click Stop Teaching. The settings that you dialed in while teaching the joint should all appear in the Dependent Parameters list. When you adjust the dial in the Dependent Parameters window, you should see the differences in the Pregnant morph respond accordingly. Before you close the Dependent Parameters window, set the value to zero.
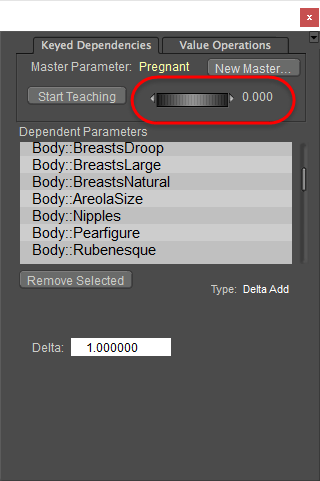
Set the value of the Master Parameter dial to zero before you close the window.
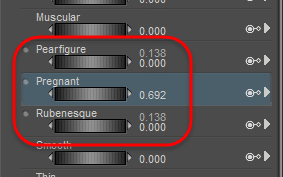
Now, go back to the Pregnant full body morph in the Parameters window. Adjust the value up and down to see how the new morph responds to the changes in the dial settings. Your new Pregnant morph should respond exactly as it did in the Dependent Parameters window. Notice how you also see the values of the PearFigure and Rubenesque dials change when you adjust the Pregnant morph. The values in the second column reflect the settings that are inherited by the links that you created with the master parameter.
When you adjust the Pregnant morph dial, the dependent parameters adjust with it.
The following figure shows the original Pregnant morph on the left, and the new improved version on the right. As you can see, the enhancements have made the morph look more natural.
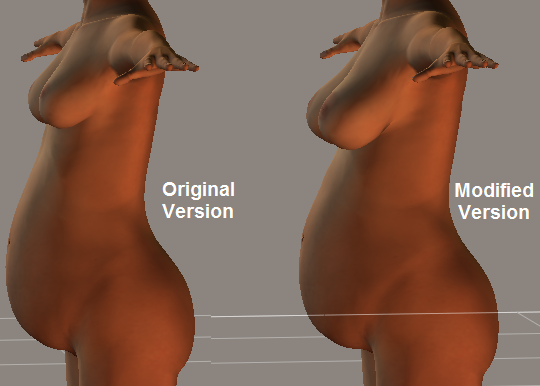
The original and modified Pregnant morph.
Before we move on to the next topic, there is one more thing to examine. The previous shot of the Parameters palette shows what happens to the PearFigure and Rubenesque morphs when you dial in the enhanced Pregnant morph. You’ll see that when the Pregnant master parameter dial is set to ..692, it drives the PearFigure and Rubenesque morphs to .138. But what happens if we want the woman to be more pear-shaped?
The solution is simple enough. You can adjust the natural value (the lower value) of the Pear Figure morph just as you can with any morph dial that is not affected by a master parameter. The following figure shows what happens when the natural value dial for the Pear Figure morph is increased to .8. The driven value, which was previously set to .138 by the Pregnant morph, increases by .8 setting as well (to .938), and the resulting shape of the figure changes accordingly.
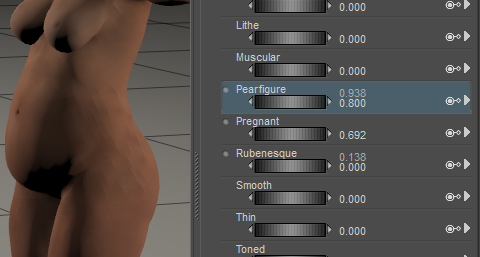
You can still adjust the Natural value of a dependent parameter without affecting the Driven value.
To summarize, Dependent Parameters can be used to create master parameter dials that drive other parameters in a figure: morph dials, magnets, light settings, material settings, rotations, and more. As you experiment with this feature you’ll realize how powerful and flexible it is.