Manually Adjusting Animated Centers and Orientations
If you prefer to manually edit joint centers and orientations, or need to tweak them after creating morph dependent joint centers, you can find controls to enable or disable animated centers and orientations in the Joint Editor. Use animated centers to adjust the center position of a joint in relation to a morph; and use animated orientations to ensure that the start and end positions of the joint are properly aligned to each other.
When using animatable origins, you will get much better bending if you first merge your spherical and capsule zones into weight maps first, as outlined in Adding a Weight Map. At a minimum, convert the body parts where the mesh is most affected by the morph (the shoulders, forearms, head and neck in the case of this alien morph). Affected actors will also allow you to create joints that bend more naturally in respect to the joints around them.
After you convert your body parts into weight maps, you can use the Joint Editor to enable or disable animated joint centers or animated orientations for each body part you need to change. Select the joint that you want to configure, and then choose the Center properties in the Joint Editor. There, you will see two key icons that enable or disable animated centers and animated orientation.
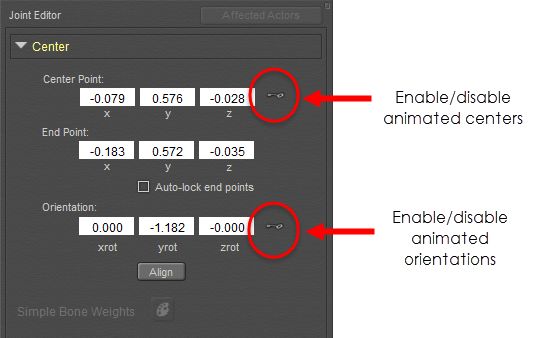
Select the joint Center, and click the key icon to enable animated centers or animated orientations.
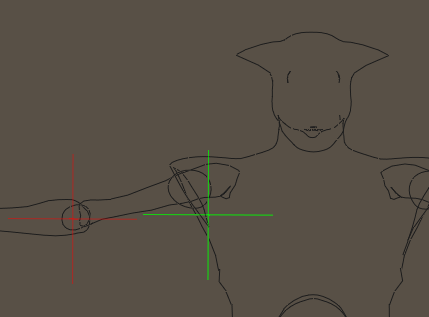
When you’re working on your centers in the Joint Editor, the start and end positions and angles of the selected joint will be displayed. When you select a body part either with the Current Actor menu, or in the Parameters/Properties palette, the information for its center, end point, and orientation will be displayed in the joint editor. The following figure shows the position and orientation of the original Andy’s right shoulder, compared to the outline of the Alien Andy shape. As you can see, the original origin (green crosshair) is not centered on the Alien’s shoulder, and its is
Original joint centers and orientations as they appear in relation to the morph.
When you want to animate the position of the center of the joint, first click the Key icon to enable animation on the joint center. Similarly, if you want to animate the orientation of the joint, click to enable the animated orientation key. The keys will turn green when enabled.
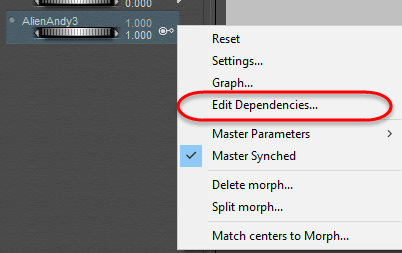
The Dependency Editor, discussed in Using Dependent Parameters, allows you to link the morph with the new positions of the joint centers. For example, after the “Alien Andy” morph is dialed in, you would select the right shoulder on the figure. Then click the arrow that appears to the right of the morph you are adjusting for (Alien Andy in this case) and choose Edit Dependencies to open the Dependent Parameters editor.
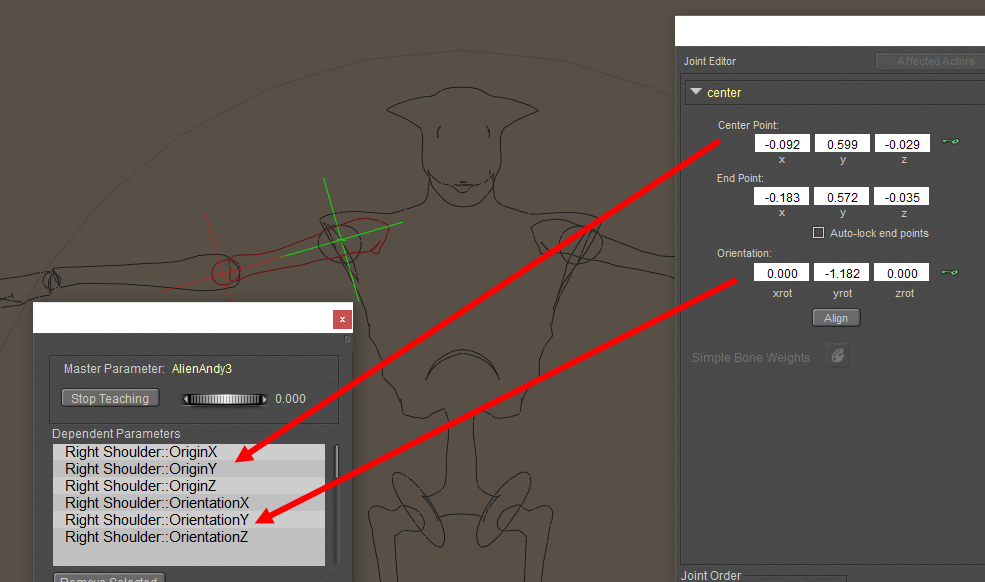
Before moving the joint centers and orientations, open the Dependent Parameters editor.
Click Start Teaching to record the new positions of the joint centers that you want to change.
- To record the new position of the joint center, simply move the green crosshair to the desired location while the animated center icon is enabled (green).
- To record the new orientation of the joint, click the Align button while the animated orientation icon is enabled (green).
- Any changes you make to the joint positions are changed in the Dependent Parameters editor as shown in the following figure.
The Dependent Parameters editor will track positions of the Origin X, Y, and Z dials after “Start Teaching” is pressed.
After you adjust the X, Y, and Z origins and orientations of the current joint, click Stop Teaching. Select the next joint you want to edit, and Start Teaching again.
DO NOT use Figure > Rig Symmetry to copy the new joint positions to the other side of the body. Doing so will copy the positions of all joints into the Dependent Parameters editor.
Continue as such until all of your joints are adjusted. They will all be recorded in the Dependent Parameters editor. After you have them all set up, click Stop Teaching again. After all of your joints are positioned you will see the morphed character pose much more naturally, and the way it is supposed to.
The new positions of the joints.